Monday, December 26, 2011

Christmas Roundup

I am recovering.  We had nine people in the house for Christmas and the 4th and 5th nights of Chanukah.  My two favorite were my grandchildren, who kept me laughing the whole time.  They left this morning to go to my daughter's in Greensboro, but will be back on Wednesday before they leave for home in Philadelphia. 
Grandpa Dan and Sasha

 
Talia and Uncle David

We had a gingerbread house disaster.  I used to make the real thing when the kids were little, but I've gotten lazy and the kits they make are really cute.  Diana and Talia (mostly Diana) put this one together.  The only help from Sasha was his offer to eat most of it.  This one looked great for about 10 minutes,then the icing started to melt. 
Dan to the rescue.  Using tooth picks he managed to bring it back.  (He always wanted to be an architect).


On Christmas Day Diana decided we should have a family picture taken, so we all went down to the dock and stood in the wind.  It will be a family picture with lots of hair blowing around.  My brother and his family came over later in the day and we exchanged gifts.  We often give joke presents to each other.  This is what he brought me.  There is a story behind that bottle of Boone's Farm.  A few years ago I gave it to him with a horse wine holder.  The horse was lying on its back and appeared to be drinking the wine.  I did this because he has horses.  I do not have a hippo and do not plan on getting one, so I'm a little concerned that he may think I'm getting too fat.
I'm going to work all year thinking about what to give him when I give him the bottle of Boone's Farm back.

The other news is the drawing for the little quilt.  I didn't do it until Christmas Eve, but the winner is Lisa Cox and I've written to her and gotten her address.  Congratulations, Lisa, hope you enjoy the quilt.

All of the great photos above are by my daughter, Diana, who is a great photographer.  You can see more of her work at http://www.flickr.com/photos/dianabowen

Friday, December 23, 2011

There's Still Time......

Everyone is having a busy week, but I just wanted to remind you to leave a message if you would like to win the little quilt/wall hanging in my last post.  Just leave a message sometime today to tell me you'd like to win.

I was having email issues, but that problem has been resolved.  Thanks to the people who gave me the "heads up" on that.

Last minute cookies.  I made these yesterday and they are really amazing and only 3 ingredients.  Here is the link to the recipe.  I used raspberry jam instead  of strawberry.  Also I used a different brand of angel food cake mix because its what I had on hand.  They are very chewy and very raspberry.   Go here for the recipe.

My other big project for the month was getting my old house on the market.  We built a new house and moved some time ago, but there was a lot to be done to the old house.  It 's taken quite a while, but its finally up for sale.  So if you know of anyone who wants to buy a big, vintage house on Virginia's Eastern Shore, send them this link.  MLS #33700   It's a 5 bedroom, 4 bath, with in-ground swimming pool.  As soon as we sell it, I can afford to buy lots of new fabric!!!!

I hope everyone of you has a very Merry Christmas, and Happy Chanukah.


Sunday, December 18, 2011

And the Winner is ....... Plus New Give Away

I am so pleased with the response from the Blog Hop.  I have 90 new followers!!!! This is really great, since I am new to blogging.
The winner of my give away is Marcia of Crafty Sewing and Quilting.  I used random.org to select the winning number.  Originally I had planned to put everyone's name on a piece of paper and then draw the lucky one.  But in the meantime, I read about random.org on a couple of other blogs and decided to use that.  So I kept the list and then assigned a number to each name.  The number generator selected number 39, and that was Marcia.

This is the prize that Marcia won
plus another surprise pattern.

Now I am going to have another give away as a Christmas present to all my new and old followers.  I will use the same system to select the winner and will do it on Friday, Dec. 23rd, so that it will be a Christmas present even though the winner won't get it until after Christmas.
This is the prize, one of my little kimono quilts (see instructions in this blog) that i posted last week.


This is a scanned picture, so part of the binding did not show, but the little quilt is 8.5 by 11 inches.  It is ready to hang or you can frame it if you prefer.
To win it, be a follower and just leave me a comment any time before next Friday, the 23rd, and tell me you'd like to have it.  And I will be happy to ship internationally, if the winner is outside of the US.

I'm sure everyone is as busy as I am right now getting ready for the holidays.  We are having a house full this year and tomorrow I'm hosting our American Sewing Guild neighborhood group luncheon.  That means I have to spend today doing a bit of cleaning.

Thanks to all who participated in the Blog Hop and good luck on winning my new give away.

Monday, December 12, 2011

Quilt Pattern for All My New Followers!


First of all let me say thanks and welcome to all of my new followers.  The Blog Hop is obviously a good thing and I've been trying to visit all of the blogs myself.  I'll have the drawing for the give away on Sunday morning and announce the winner here right away.  I'll also be having another give away for all of my new followers (and old, also) that I will tell you about then.  And speaking of give away, my friend and fellow blogger, Rhonda, is having a give away today only on her blog, Rhonda's Creative Life.  Today is her birthday and she's giving away a lovely needlecase.  She's not on the Blog Hop because she is not a quilter, but her clothing and tailoring is absolutely exquisite.  So head on over there and sign up to follow her.  Just click on the link above.

I decided to give you a pattern that I designed and published in 2001.  I've simplified the pattern a bit for this blog.  The original pattern was written on my old computer and didn't get saved when it crashed, so I needed to type it over for this.  I scanned the illustration below and also scanned the actual little quilts, because they are the  same size as a sheet of paper, 8.5" by 11".  The binding got cut off, but they show up much better than my photos.

Your first step is to make a base quilt.  This is 8.5 by 11.  I quilted most of the ones I made using  a simple meander with metallic thread.  Bind this and then make the kimono.  To do this you need 2 pieces of fabric 5" by 15 1/4".  These should contrast but coordinate.  With right sides together, stitch all around, leaving a small opening for turning.  Use 1/4" seams.  Turn to right sides and press.  Fold the kimono using the illustration below and pressing at each fold. 

Now add an Obi to the waist area of the kimono.  Cut a piece of fabric about 3 inches square.  Pleat it, or manipulate it in some way so that it measures 3" by 1" and stitch this to the kimono, tucking the ends behind.
Once you have made your little kimono, you can hand applique it onto your finished base quilt.  Now make the ties that you see on the corners.  Cut a piece of fabric  7" by 2 1/2".  Fold it in half, the long way, with right sides together, and sew together the cut edges.  Leave an opening in the middle of the long side for turning.
Turn and press.  Tie a loose knot in the center and stitch onto the base as shown.

I add two little round plastic curtain hooks (I think that's what they are called)  to the back corners for hanging, or you could add a sleeve, if you wish.

If you decide to make this, please send me a picture and I will post it here.  I hope you enjoy the pattern.

Friday, December 9, 2011

Blog Hop Party with Prizes!!!

I've listed my blog for the Quilter's Blog Hop Party!!! There are over 200 blog sites participating and you will have a chance to win a prize from any of them.  Each blog has its own rules for winning, but all you have to do is hop all over the web to enter.

First of all, let me show you what I am giving away.
There are four batik fat-quarters, a really cute book Kids Quilt Together, and two patterns: one is a Lazy Girl pocketbook and the other is one I designed and marketed.  The one by me is only available from me and I don't have many copies left.  I will also be adding a "mystery" pattern, which will be a little surprise for you, if you win.

In order to be in the running for my prize, you must do two things:
1.  Be a follower of this blog or register to be a follower during the contest.  To do this, click on the Join This Site button to the right.  A box will appear that asks if you want to follow publicly or privately.  Click the Publicly button, otherwise I won't know who you are.  Please do this at the top.  For some reason I have a second box like this at the bottom of my first page, and when I try to remove it, both of them disappear. 
2.  Leave a comment sometime during the Blog Hop telling me that you want to win.

The Blog Hop starts December 10th at midnight and runs through December 17th.  I will be drawing for my prize on the 18th and will post the winner on that day.  The winner can then contact me with shipping information and I'll get it right out by Priority Mail.  I will be happy to ship internationally, if the winner is not in the U.S.

In order to visit the other participating Blogs, you can click on the button to the right that says "Blog Hop Party".  The other sites will be visible there as soon as the Party starts (midnight Dec. 10th). 

I will leave a reminder of the Blog Hop on each post I make between now and the 17th.  I'm hoping to get lots of new followers which will encourage me to do lots of new posts on quilting.  I'm looking forward to hearing from all of you.  Please visit as many of the Blog Hop sites as you can.

Thursday, December 8, 2011

Sewing/Knitting Basket Ornament

This turned out a little differently than I had planned.  It was going to be two ornaments, one a sewing basket and the other a knitting basket.  However, the two small baskets I was sure I had, were no where to be found.  In fact, I wasted a good part of yesterday morning looking for them.  So on to Plan B.  I found the larger basket shown above and decided to combine them. 
This photo gives you an idea of the size of the basket.  I am going to give you a tutorial for how to make the little pin cushion and tell you how I did the rest.  Now check back tomorrow.  I haven't glued any of this in the basket yet, and tomorrow when I go to see my mom, I'm going to check at the thrift shop to see if I can find some smaller baskets.

For the little pin cushion, you will need a circle of red cotton 4.5" in diameter, some green embroidery floss, a little stuffing, and a tiny piece of green and red felt.
Using 3 strands of floss, stitch all the way around the perimeter of the circle using a running stitch.
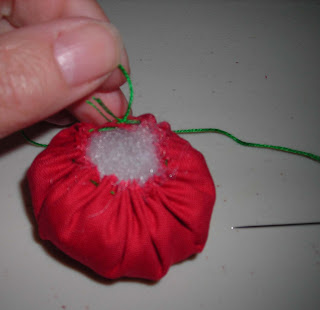
Draw up your thread and add stuffing to the center. After its stuffed, pull tight to close.
Now wrap the thread around the pin cushion and secure with a stitch in the bottom.  Do this until the pin cushion is evenly divided into 8 sections.  Secure the threads on the bottom and then bring your needle all the way through the middle of the pin cushion so that it comes out on the center top.
Add the green leaf cut out and then sew on a little strawberry cut out leaving a one inch piece of floss between the leaf and the strawberry.  You can now tie it off and its finished.  I used Clover applique pins, which are very small, in the pin cushion.

To make the pattern envelopes, I scanned a couple of vintage patterns and reduced them in size.  Then cut them out.  The button card is a piece of card stock with beads sewn on.  The pattern is just a piece of pattern tissue that I drew on and then pinned to fabric and cut out.  The tape measure is a piece of silk ribbon that I made marks on.

For the knitting side, I used sock yarn to make small balls and hanks of yarn.  The knitting needles are cut off bamboo skewers with a bead glued on the end.  There is a little knitted sweater that's hard to see and the instructions to knit that will be my post for tomorrow or maybe Monday. 

On Saturday I'll have an announcement about a "Blog Hop" and give-away that I will be participating in next week.

Tuesday, December 6, 2011

Tutu Cute! (Updated 12/15)

This may be the cutest Christmas ornament I ever made!  I made two, a red one and a pink one.  Yesterday I made the red one and worked all the bugs out.  It was too big and I used too many layers of net.
Also, the coat hanger I used on the pink one is cuter, but I didn't find that one until today.  The over all  size of the pink one is about 6 inches and the red one about 7.  I'm going to give the dimensions for the pink.

You will need:  a piece of felt 5.5" by 6", about 1/2 a yard of tulle, a few beads, some ribbon for straps,  and a doll's coat hanger.

Fold the felt in half so that it measures 2.75" by 6".  Sew a very narrow seam as shown below.
This will be your center back.  Turn to the right side and turn down the top edge about 1/2 inch.  Now make the leg openings.  See my photo.  I cut out an opening on one side and used the cut out as a pattern to cut out the other side.  The crotch area should be about 3/4 of an inch in width.


Cut ribbon for the straps.  These should be about 3 inches long, but cut it slightly longer so that you can adjust them to what looks right when they are on the hanger.  I sew the ribbon on the front first using the beads to help secure the ribbon.  Sew the beads on anyway you like.  I used bugle beads on the red tutu and large silver seed beads on the pink.  Once you have the straps sewn in front and the beads sewn on, sew the straps to the back.

The next step is to make the net skirt.  I used 6 layers of tulle for the pink tutu.  You will need to fold the tulle in half until it measures 24" by 18"(2 layers).  Then fold it the other way twice  to give you 6 layers.  It should now measure about 24" by 6".  Stitch down the middle of the long side to gather.  Make two rows of stitching, leaving a long thread on each end.  I'm showing the red below, because it is easier to see.
Now pull both threads until you have gathered the net up to about 6 inches.  You will sew the net onto the body of the tutu before you trim the net. This makes it much easier to handle.
Using a fairly large needle and double thread, secure the gathered net at the back seam at about where you think the waist should be.  You could use a vanishing marker to mark the stitching line if you wish.  Sew through the middle of the two lines of stitching as you go around the tutu.  Adjust the gathers as necessary so that it fits with just a little overlap at the back seam.
Once you have gotten the skirt sewn into place, you can sew up the crotch.  Leaving it open until this step allows you to get your hand inside as you sew on the skirt.  Lap the front of the crotch over the back and secure with a few hand stitches.
Now you can trim your skirt to the desired width.  Cut through all layers of the tulle trimming off at least one inch or more depending on your preference.  Separate all the layers to "fluff" the skirt and put it on the little hanger. 

I think my granddaughter, who is coming for Christmas, will really enjoy seeing this little ornament on the tree.
Update for 12/15:  I have entered this ornament in the CSI Handmade Ornament Challenge.  You can click on the title for this blog to visit the site and see all of the entries. 

Monday, December 5, 2011

Heart Ornament

I've had fun today playing around with ideas for Christmas ornaments.  This is one that I made to sell and sold, so I made another this morning.  There will be a few more as the week progresses, hopefully one each day. 
To make the ornament above you need a square of yellow felt, small pieces of 2 shades of red felt, black seed beads, green embroidery floss and a small amount of fiber-fill for stuffing.
Make a pattern for a heart.  Mine is about 5 inches across.  Cut out 2, one for the front and one for the back.
Cut out the red felt in various sizes in a free-hand manner.  You don't need a pattern, just think flower petals.
Arrange the flowers on the heart front in any way you want.  Use a small flower part on top of a larger piece to give the flower some depth.  Sew on by sewing a bead or two in the middle (depends on how large your beads are.  Mine are quite large, so I only used one).
Now embroider your stems using 3 strands of embroidery floss.  I used a chain stitch, but you could use a stem stitch.  You could also do this on your machine with a small zig-zag if you wish.
The next step is to sew the back to the front.  I used a blanket stitch, but again, you could do this by machine.  Leave a small opening on one side to insert the stuffing.  Its easier to close if you leave the opening on a straight side, not a curve or point.
 Sew up your closing and sew a loop of ribbon to the top of the center back for hanging.
Hope you enjoy the pattern.


Saturday, December 3, 2011

Quilts for Kids for Christmas and Mom's Memory

A few weeks ago I mentioned Quilts for Kids and their request for holiday quilts.  I just finished some and will be shipping them on Monday (I need to find a box!).  I decided to send a couple of regular quilts as well as the Christmas ones.  These are small quilts, they vary in size from 36" by 36" to 40" by 55".  I used some fabric pieces that I had cut sometime in the past and don't remember the original project.  Quilts for Kids asks that all quilts be sent pre-washed, to save them one step in the process.

My mother is almost 91, lives in assisted-living and reads a book a day.  For months she has been telling me that I have one of her "little pillowcases".  These are are small white pillow covers that she bought years ago when she went on a cruise.  She had two, but could only find one in her room.  I kept telling her that I didn't have the other one.  Well guess what.  When I went upstairs yesterday to get my Christmas placemats, towels, etc.  there was her pillow case in the same drawer.  So I washed it, ironed it, and took it to her this morning.  "I knew you had it," she said.  I guess Mom still knows best.

Next week I'm going to have a tutorial each day for a Christmas ornament. 

Have a good weekend.

Wednesday, November 30, 2011

Etsy Store

My Etsy store is finally up and running.  After putting it off ( I opened the account some time ago), I felt it was now or never, so here is the link.  There is also a button to the right that you can click to get there.

I used to sell on Ebay (my name there is Granmakitty), but never seemed to be able to sell more expensive items, like my quilts.  So we'll give Etsy a try.   

This is one of the four kimono quilts that I have on Etsy.

And this is one of the two fish quilts.

I'm still trying to catch up from the weekend tour.  Maybe by tomorrow I can get back in the studio and get some sewing done. 
Have a good day.

Monday, November 28, 2011

Artisans Guild Tour

A long weekend!  The tour was Friday, Saturday and Sunday and I feel like I stood up for the entire time.  Sales were good, but mostly for small items.  Most people were not willing to part with much more than twenty dollars, so I only sold one wall hanging and one baby quilt.  But I sold out on my tree ornaments and mug rugs.
I had made 50 of the mug rugs, just scrap fabric and batting, and sold all but 4!  Once before I had taken them to a show and not sold any.  The eyeglass cases sold pretty well and also the make-up bags (I'll do a tutorial for these on a later blog).
But my baby quilts, which usually sell quit well, were just not moving.  Also the wall hangings didn't sell either.  My display was not the best, but I had to work with the space.  I was in front of the photography booth (Dan put me there to protect it), so no place to hang anything.  The pottery on the photo background is Dan's.  We're hoping we both sold items at Sea Glass and Stories in Cape Charles where we display.
I was in the same room with a basket maker and a bird carver.  It was fun visiting with both of them.  Deb, the basket maker, is also a knitter and knit these cute vegetables for her display.  People kept wanting to buy them, but she didn't want to sell.
I am so glad the weekend is over.  Now I can get on to decorating and baking for Christmas.


Thursday, November 24, 2011

Happy Thanksgiving

We're having a very quite Thanksgiving this year, probably the quietest in a long time.  It's just Dan, Diana and me.  But we are still cooking a big meal in anticipation of eating left-overs all weekend.  Pictured below is Dan's smoker.  He loves to smoke the turkey instead of roasting or frying (we've never had a turkey fryer and I don't think I've ever eaten it fried).


Please note that Dan is wearing a RED shirt because of what I wrote about his clothes in my last post.
And here is a picture of the turkey, not done yet.  That's a pork roast next to it for later in the weekend.
Diana is peeling potatoes and Dan is making gravy.  I did all of my part earlier; sweet potato biscuits, stuffing, and apple pie. 
I'm feeling thankful for all of my family, here and around the country, and for this beautiful day. 

It will be a busy weekend with the Artisan's Guild Tour.  I'll post some pictures of my display sometime over the weekend and some pictures of the work on display.  If you go to this link you'll see the newspaper article that came out yesterday.  And they mentioned my blog!!!!

Have a Happy, Happy Thanksgiving!!


Sunday, November 20, 2011

Christmas Sweaters: The Real News

This morning on the news was a story about Christmas sweaters.  The reporter stated that they are "back in style".  Who knew?  I mean who knew they were out of style.  Why don't my friends tell me these things?  Have I been cutting edge for years?    I'll admit I only have one that I have worn for the past year or two.  Its very conservative, from Coldwater Creek.  But I have a box full of the ones described as "ugly"  on the Daily Green.

When I first started working in a nursing home, I was an activity director.  I liked to wear clothes that reflected the holiday, so I had Halloween sweaters, Spring flower sweaters, as well as numerous Christmas sweaters.  The residents (at least the ladies) loved to comment on my clothes and it gave them something to talk about besides what was for lunch.  My skirt length was always a great conversation starter.  It was either too short or too long, I could never get it right.  I either wore too much make-up or not enough.  But the sweaters were always a winner.  I never had one resident who didn't like one of my sweaters.

Apparently it is now the fad for men to wear these "vintage" women's sweaters (go to the link above and look at the slideshow) and people have parties where you have to wear an old Christmas sweater.  I don't think I'll suggest this to Dan.  All of his clothes are beige or blue.  I'm not kidding.  My oldest daughter laughed her head off the first time she looked in his closet.  My mother gave him a red sweater about 10 years ago and he wore it once, to be polite.  The Christmas sweater would just not go over real big with him, so don't invite us to one of these sweater parties.

I'm thinking that between my mother and myself we might be able to make a fortune on ebay if I get started soon.

Thursday, November 17, 2011

Quilts for Kids

Quilts for Kids is a non-profit organization who supplies quilts to hospitals for sick children.  Its a nationwide group, with local chapters, that serves as a clearing house for donated quilts.  Upon request, they will send you fabric and a pattern for making a quilt.  You need to provide the batting and agree to return the quilt within a few weeks.
The three quilts pictured above are some that I made from the kit that they sent me earlier this year.  I just got an email from the organization, asking for quilts for the holidays.  I started looking through my stash of fabric, especially holiday prints, and plan to ship a few quilts to them right after Thanksgiving. 

Follow this link quiltsforkids.org to request a kit or get guidelines for making quilts from your own fabric.

Monday, November 14, 2011

Lynda's Quilt , Punch Needle Progress, and 2-ingredient cakes

I have spent most of today finishing this quilt for my friend, Lynda.  Its a Christmas gift for her daughter.  I loved the way it turned out and especially loved quilting it.  Many of the fabrics she used were purchased in my quilt shop when it was open, so that brought back some memories. 

Here is an update on my punch needle project.  It doesn't take long to do, but its really labor-intensive and hard on the eyes.  I took the picture on a piece of fabric that is a vintage kimono sleeve (silk) that I bought years ago at a tag sale.  I'm thinking of adding some pink to the jelly fish and making the bag out of part of the sleeve. 


Here's a link to Big Red Kitchen  where you will find a recipe for a 2-ingredient cake.  All it takes is a can of pumpkin and a cake mix.  I've made it with yellow cake and spice cake and I like the spice cake better.  I baked them as muffins.  There is also a two ingredient lemon cake recipe that I found on Pinterest.   I've been looking for the link for a while and just can't find it again, but here is what it is.  Mix one box of Angel Food cake mix and a can of lemon pie filling.  That's it.  Bake it in a 9 X 13 pan for 25 to 30 min. in a 350 degree oven.  I made it a few weeks ago and I'm just about to go and pop another one in the oven.  Even Dan liked it, and he's not a fan of cake.  While searching for the link to the lemon cake, I found another 2 ingredient cake, made from a brownie mix and a can of Diet Coke.  I'm not sure about the making it with Diet Coke, but I might try it with regular Coke.  I don't drink soft drinks, so I'd have to make a trip to the store before I try this one.

If you have never visited Pinterest, you really should.  You can click on the link above or the one in the right column.  It's addictive. 

Saturday, November 12, 2011

Punch Needle Embroidery

After finishing the little bag that I showed you earlier this week, I remembered these little bags that I made a couple of years ago. 
I call these "cruise bags" because they are perfect for a cruise, just large enough to hold your cruise card, lipstick, etc.  I've made a lot of these like the green one pictured below, and sold a number of them, but these are the only ones I've made with a punch needle decoration.
The bags range in size from 5" by 5" to 6" by 6".  I make the straps long enough to wear across the body.  It is basically a rectangle of quilted fabric folded in thirds.  In the green example, I bound the edges after sewing up the sides.  In the other two, I just sewed up the sides using a jeans needle. 

I decided to make another one with a jelly fish.  There is a tutorial for punch needle embroidery on this site
http://www.amherst-antiques-folkart.com/PunchNeedle_Howto.htm.  I'm sure there are others, but this one has the basics.  They recommend a Russian punch needle, and so do I.  Pictured below are my punch needles, a Russian one and one from Clover.

The one in the case is the Russian one and the green one is by Clover.  I just prefer the Russian one, its sharper, easier to hold and use.  It also costs a lot more.  The hoop is necessary to hold your fabric and needs to be one that really grips the fabric because you put a bit of pressure as you embroider.  The fabric should be a loose weave cotton or linen. 
Here is my hooped jelly fish.  I drew it on with a blue marker.  This doesn't have to be the kind that washes out, because its on the back of the fabric.  This is the trick with punch needle that I didn't get at first:  you work from the back and your actual embroidery is on the reverse side. 

I  keep you updated on my progress on this little embroidery.  I plan on starting it tonight.
Have a great weekend.


Thursday, November 10, 2011

Art Quilts

Today I was looking for some inspiration and started reviewing photos of some of the quilts I have made.  I decided I would post some of the pictures here.  I no longer own most of these quilts, I have sold them or given them away.  It occurred to me as I was looking at them, that I don't spend a lot of time making art quilts.  What I do is make a lot of "crafty" things, clothing, etc. and while I am doing that, I think about making art quilts.  Maybe that's the way its supposed to be.  I did a drawing today for a new quilt, but I won't be able to start it until after Thanksgiving or maybe even after Christmas.  In the meantime, I'm busy doing the "crafty" stuff for the Artisan's Guild Thanksgiving Weekend Tour. 

Dan is critical of my use of the word "craft".  I know the difference between art and craft.  I also know that 95% of what I do is craft. 
This is painted with textile ink.  I began by "drawing" the poppies with my sewing machine, then painting them with the ink.  The centers are beaded.  Its about 25 by 30 inches.   The border was an Alexander Henry fabic.

This is currently hanging in my living room.  The background is pieced and the blue mason jars are appliqued on and then painted with textile inks and stitched.  The vines were made with clothesline and the leaves are individually stitched.  This was in the Mid-Atlantic Quilt Show in 2009.

Finally, this quilt was sold about 6 years ago.  It is all applique, no painting.  The woman who bought it had it framed in a heavy white shadow box frame.  It's quite large, but I can't remember the exact measurements.

I hope these are inspiration for your creations.  Have a wonderful evening.

Tuesday, November 8, 2011

TA-DA

Here is what I made with the wrong side of the fabric I showed you yesterday.  First, let me say that I am not a photographer, and second, I did try to take this picture both inside and outside, but the one shown is the best of the lot.  Also thanks to Rhonda of Rhonda's Creative Life for this pattern.  As you will read when you go over to her blog, she gave away the pattern to anyone who wanted it for a limited time.  She is now selling the pattern on Etsy and you can find it HERE.

I made a couple of changes to Rhonda's pattern because of the weight of the fabric.  As you can see from her's, its suppose to be a clam shell bag.  That meant you had to add the strap on the seam line.  I couldn't do it.  The fabric is just too heavy and thick.  So I put my strap in the middle of the sides.  It still works as a wristlet, but does not have the pretty shape that Rhonda's has.  I also beaded mine, I'll bead anything, I just love to sew on beads.  The lining is a turquoise silk that I've had forever and the contrast is very nice with the red/blue/green of the fabric.
Here's another shot showing a bit of the lining

I'm hoping to have somewhere to wear this during the holidays.  It really does have a festive look and looks much better in "real life" than in my photo.