Wednesday, November 27, 2013

Thinking Ahead a Few Weeks


I know that tomorrow is Thanksgiving, and I'm ready for it.  The turkey is thawed, the cranberry sauce is made.  I've got all the ingredients for the rest of the feast, and now I'm almost ready to start thinking about Christmas.  Actually, I've done more that think about it, I've done about half of my shopping and wrapped everything that I've bought so far.  I've also wrapped about 25 empty boxes to be used in the window of the thrift shop where I volunteer, but that window won't get done until next week.  As a result, my dining room looks like I'm more ready for Christmas than I am in reality.

Thinking back over the blog-posts I've done in the past, I decided to revisit some of the Christmas ornament tutorials in case you are wanting to make something after the turkey and parade tomorrow.

The tutorial for this little sewing basket ornament can be found here http://weirwoodstation.blogspot.com/2011/12/sewingknitting-basket-ornament.html


The tutorial for this little tutu ornament can be found here http://weirwoodstation.blogspot.com/2011/12/tutu-cute.html


This little heart can be found here http://weirwoodstation.blogspot.com/2011/12/heart-ornament.html


This is the easiest one of all, especially those of you with a large "stash" of fabric scraps.


The link to the tutorial is here http://weirwoodstation.blogspot.com/2012/04/easy-ornament-tutorial.html

Hope these will inspire you to do a little sewing in the upcoming weeks.  Happy Thanksgiving and Hanukkah!

Wednesday, October 30, 2013

View from my Porch


Each morning when I get up, I look across my yard and see the cotton field.  It looks like snow, especially on these early fall mornings when there is fog.  Actually, I walked down to the road to take this picture because there are trees and plantings between my porch and the road, but its quite beautiful.  The farmer, who I have known since childhood, alternates this field each year between cotton and soybeans.  He'll probably be harvesting it in a few days and there will be huge bales of cotton sitting there.

And speaking of fields, I thought I'd share a picture of Dan standing in a pineapple field in Hawaii eating pineapple.


When we first talked about going to Hawaii, Dan said all he wanted to do was stand in the middle of a pineapple field and eat a pineapple.  I told him that I didn't think you could just do that and I was right.  First of all, there is only one working pineapple farm left in Hawaii.  Its on Maui.  All the other farms have closed due to high labor cost.  All our pineapples are now grown in Costa Rica or the Phillippines.  Fortunately, there was a tour available to tour this farm so of course, we had to take it.  The guide was great and let Dan and others eat all the pineapple they wanted.

Here are a few other pictures of our trip.


Farmer's Market in Hilo.  


Saturday, October 26, 2013

Some Things I've Been Doing


I spent most of the summer experimenting with fabric painting techniques.  When I was in graduate school, I worked with Procion Dyes and painted my quilts with them.  Later, I became worried about the adverse health effects for long term exposure (I'll admit I was not always as careful as I should have been.)  I used acrylics for a long time, but did not like the texture that they left on the fabric, so this summer I tried a variety of inks. The six quilts or paintings above are the best of the results.

I pieced the backgrounds,using mostly 1"to 1.5" strips and then "drew" the shells with my sewing machine.  I then painted the shells using the inks.  Finally, I stretched them on 16" canvas stretchers.
This is now hanging in my bedroom over my bed.  I painted the wall that pumpkin color when we moved in the house, but had not found just the right thing to hang there.

We've just returned from a trip to Hawaii and I'll post some pictures of our trip later.  Right now I'm recovering from a terrible cold that I caught near the end of the trip and trying to get all the laundry finished so that I can get back in the studio next week.

Sunday, September 29, 2013

End of Summer


When I was in school and later, my kids were still in school, I always felt that the first day of school was the end of summer.  After I became a "mature" adult, I began to mark it by my birthday in mid-September.  This year I decided that today was the end of summer.  Two of my daughters and their children came for a brief weekend visit.  The kids all made one last trip to the beach yesterday (it was too cold for me!) and Dan and my son-in-law when on a 4 hour kayak journey.  Dan got stung by a wasp, twice, but other than that I felt somehow, that summer ended.

I haven't been blogging this summer because I've been doing a lot of experimenting with surface design.  Soon, I will be posting some of the results, but I still haven't had time to take any good pictures.  Also, along the way I had a few failures i.e. marbling.   I'll attempt that again.

We did have one little summer trip to Asheville, NC.  I rented a cabin about a mile from the Skyline drive.  The cabin was fantastic, but the driveway was a nightmare.  We got there after dark, I was driving, and I came to what I thought was the edge of a cliff.  I got out of the car and looked and the drive went straight down.  I've been driving since I was 15, but I could not drive down that road.  Dan had to do it with me hiding my head in my lap the whole way!

Here are a few pictures of our vacation.  The hot tub was on the porch of our little cabin and the kid teenager in it is my grandson, Steven.  He and his mother and father and his other set of grandparents all came to Asheville at the same time (but sanely stayed at the Hampton Inn), so we had a nice family reunion.


That's the Biltmore, not our little cabin.  It's well worth the trip to Asheville for a visit if you're never been there before.  We went about 15 years ago and wanted to go back.

I'll be back soon with some pictures of my summer's work and a new tutorial.

Hope you are having a good end of summer and beginning of fall.

Wednesday, June 26, 2013

Jeans Upcycle

I am finally getting around to writing again.  The past two months have flown by and each day, I tell myself to go to the computer and post this tutorial and each day something else takes over before I can began.


This is a new version of a recycled jean's purse.  The size is approximately 16" by 21".  I've made 3 of these with different strap lengths varying from short to long (this one).  For the straps and the D-rings that attach them to the bag, please refer to my blog post on the Valentine Kiss bag that I posted back in February.

Materials needed:
Pair of jeans (you can get 2 bags from one pair)
strips of fabric various widths from 1 1/2" to 3" by width of fabric.
1/4 yard fabric for pocket inserts
Material for straps (see above)
4 D-rings (1 1/2 " to 2")
1/2 yard of fabric for lining
Piece of muslin or other plain fabric 22" by 36"
Piece of study batting 22" by 36"
Thread and other notions.

Lay muslin on cutting board and top with batting.  Cut jeans apart so that you have one back pocket and one front pocket with enough leg fabric to sew them together as shown above.  Watch out for metal studs, zipper placement, etc. because you are going to be sewing along the edges.  The pair above are about a size 14 women's jeans and had enough extra fabric to leave a good margin for the seams.  Since I did this bag, however, I have made one with a pair of children's jeans and it worked out fine.

Cut a piece of fabric that will fit behind the top of each end of the jeans to make a pocket.

I can't really give you a dimension for this, it will depend on your jeans.  Now stitch down the sides and across the bottom, just below the jean's pocket, to make a pocket behind the jean's section.

Add strips of fabric, as shown, using a "flip and sew" method.  Press each section as you go.

I used wider strips on either side.  Square this up and trim edges.

Cut a lining the exact size of this finished piece.

Sew up the sides of the bag, and square the bottom corners as shown in the Valentine Kiss bag tutorial.

Sew the sides of the lining and also square the corners.

At this point add the D-ring holders to the outside of the bag.  Then insert the lining into the bag and pin around the top.

I used a bias strip to bind the top of the bag and then added the straps.  You could also follow my instructions for lining that I used on the Valentine Kiss Bag or add pockets to the lining.

Here is the finished bag.

I've been collecting jeans recycling ideas on Pinterest.  You can view my board here.  Save all of your left-over jeans parts to use later with some of these ideas.

Saturday, April 6, 2013

Not as Busy as I'd Like to Be

Last week I accomplished a number of things.  First I want to tell you about the pile of pillowcases I made for a good cause.


I made 20 to send off to my blogging friend Rhonda in Chicago.  She asked for help in reaching her goal of making 900 ( yes, 900) pillowcases to send to Mary Bridge Children's Hospital in Puyallup, WA.
You can read her blog about her original request here .  I think know she can use more help if you are interested in making some for her.

Rhonda received my pillowcases and blogged about them yesterday.  Here is a picture of my pillowcases hanging on her clothesline in Chicago!


You can read about her progress here.

That was the beginning of last week.  Now what happened at the end of the week?  I ended up in a "boot".

This is a picture of my left foot.  I went to an ankle specialist because I've been having a lot of pain in my ankle and found out that I have a torn achilles tendon.  I'd like to say that I tore it while running a marathon, but if you know me, you'd know I was lying.  I really don't know exactly how it happened, but I'm stuck in this boot for a month and then I still might have to have surgery.

In the meantime, I'm knitting.  I finished the black and white stole below and started on a blue one.  The blue yarn has a metallic thread running through it that doesn't show up in the picture.
The yarn is Paton's Lace and takes 2 balls.  Here are the directions.
Use size 6, 7 or 8 circular needles.
Cast on 120 stitches ( use 108 if you want it longer).  Knit 4, *yo, K 2 tog, K 2, repeat from * to last 4 stitches.  Knit last 4 stitches.
Repeat this pattern until almost out of yarn.  Knit one row and bind off.

I'll keep you posted on my knitting progress and let you know when I finally get the boot off.

Sunday, March 24, 2013

New Toys

I didn't go to the Mid-Atlantic Quilt Festival this year.  Usually I go, spend the day, and spend a couple of hundred dollars on books, fabrics, maybe a class, lunch, tolls, etc.  Why am I telling you this?  Because its the reason I was able to justify spending money on this box of fabric.


Its all Fossil Fern fabric and there are 90 fat quarters.  And what am I going to do with them?  Good question, I don't really have an answer.  So far, I haven't even taken them out of the box.  I just run my hands over them and marvel at the colors.  Dan saw me and said "if it makes you that happy, buy another one and I'll pay for it,"  I didn't.  If I bought another box I'd feel I had to do something with them.  This way I can just stare at them for awhile.

Tuesday, March 19, 2013

Blog hop Winner

The winner is crafter1953!  I've sent her an email and hopefully she will send me her shipping information.  If she doesn't send it, I will draw again.

I put everyone's name on a slip of paper and then drew.  There were several "Sandra's", so I used the date of the comment to tell them apart.

I enjoyed learning where everyone was from and am happy to have my new followers, welcome.

I've been away for a few days visiting my daughter in North Carolina, so I'll have some new posts coming out soon.

Thursday, March 7, 2013

It's Time for the Blog Hop

Forget your winter blahs, and hop around the internet.  No need to get dressed, wear your robe and slippers.  To find the other participants, just click on the "Blog Hop Party" sign to the right of this post.  There are over 100 and all of them are offering a prize.  The party officially begins March 8th.
Here is the prize I am giving away.  You don't have to live in the U.S., I'll ship it anywhere the postal system delivers.


Yes, its one of the recycled jeans purses I described in my last post.

I haven't done one of these Hops for awhile, but its fun to see how many people stop by.  It's also fun to see where they are from.  So here are the rules:

  • To be eligible for the prize, you need to leave a comment on this blog.  In the comment, tell me where you come from.  
  • In order to leave a comment, you must follow my blog.  If you try to leave a comment and you are not a follower, it won't go through.  (See my previous post for the reason for this.)
  • I will have the drawing on Tuesday, March 19th, so you can leave your comment any time up until midnight on the 18th.  I'll announce the winner on the 19th and you can send me your mailing address.
Good luck to everyone!  If you don't win my prize, maybe you'll win something on one of the other sites!
I plan to visit as many of the others as I can.

Tuesday, March 5, 2013

Recycled Jeans Purses


Front of purses


Back of purses

Yesterday I finished six purses that I had been working on for some time.  I used the back pocket of old blue jeans to make the back of the purses and some of my Seminole patchwork pieces to make the fronts.  The shoulder straps are adjustable, see the photo below.  I used small D-rings.
The longer strap is 42" (fabric width) and the shorter one is 12".  Over all the body of the purse measures about 8" by 12".


I took three of the purses to Beach Glass and Stories in Cape Charles, where I sell some of my art crafts.

I also finally finished the crewel embroidery that I had promised my mother I would finish for her.

You may remember that I blogged about it here.

Here is the finished piece, although I still need to block it before having it framed.


If you have tried to leave a comment recently and have not been able to, its all because of "spam". Over the last couple of months I've gotten a ton of spam comments so I have changed my settings so that only followers can leave comments.  A lot of the comments are simply promoting other web sites, most of which I don't wish to help promote.  So if you want to leave a comment, please join as a follower and I'll welcome your comments.

Friday, March 1, 2013

Links

I've got a few links to share with you all today.

Number one is my guest blog.  My friend, Rhonda, from Rhonda's Creative Life, asked me to do a guest blog, based on the make-up bag/lunch bag/purse tutorial I did a few weeks ago.


This is the bag I made especially for her blog.  You can see the tutorial here http://rhondabuss.blogspot.com/2013/03/fabulous-free-pattern-friday.html
I'm so grateful to Rhonda for honoring me like this.  Be sure to check out some of her other posts, especially the Free Pattern Fridays.  I've used several of her patterns and she really knows how to draft patterns.

My number two link is political, but its Diana's new job.  She has gone to Boston to be the videographer for Ed Markey's campaign.  This is a link to a video she made a few weeks ago.  She'll be working for him through the election.
http://www.youtube.com/watch?v=2wtvXMuGWhc&feature=youtu.be
We are really proud of her.  She just graduated from college last spring!!!!

My third link is to my new real estate agent's blog.
http://www.easternshorevablog.com/
Scroll down to the second entry and you'll see my old house, which I have been trying to sell.  Hopefully, the new agent and new publicity will do the trick.

And my last link is the to Princess Cruises and the cruise I have decided to take next year.  I'm doing this by MYSELF.  Leaving Dan at home.  It occurs to me that I've never been by myself for seven weeks at a time in my whole life.  First I lived at home, then college (with room mates), then husband #1 and 3 kids.  As soon as the last child left home, Dan and his 2 kids moved in to my life and we moved in together.
http://www.princess.com/find/cruiseDetails.do?itinCode=VSA490&voyageCode=3408C&resType=C
So I'm going to spend the next year getting ready for this adventure.

And now you know why I need to sell the old house.  How else am I going to be able to afford this cruise?

Thursday, February 21, 2013

Thinking of Spring

I'm tired of the cold and wet winter.  Snow would have been nice, but all we got was a bit of slush.  So I started thinking about making something to wear when the weather finally warms up.  I'm also thinking about clothes to take on a cruise that I've booked for next year.  More on that later.


I've had this pattern for a couple of years but never got around to doing anything with it.  Last week I showed you some silk that I brought back from China.  This is another piece from that trip.


I thought it would look good with black slacks and a tank top to wear to dinner on a cruise, but I wasn't about to cut into it until I tested the pattern.  Besides I wasn't sure I had enough fabric.  I bought 2 meters, which is 2 yards 6 inches.  The pattern for the shorter version needs 2 1/2 yards.  Usually I can make it work, but since I hadn't tried the pattern I wanted to be sure.

I found a piece of light weight denim that someone must have given me. (I think when you sew, you attract fabric like a magnet.)  It was about 1 1/2 yards, not enough for a jacket, but enough for a vest to test the pattern.


This is the front.  It looks a little stiff because I still haven't hemmed it or tacked down the facings. I used bias to face the armholes.  The pattern went together beautifully and I plan on cutting out the silk tomorrow.  As you can see, I added a bit of embellishment to the vest, the denim was just to plain and boring by itself.


When I brought it back over to the house to do the hand sewing, I remembered this scarf that my friend Linda brought me from Italy last fall.  The colors are perfect and I really had not planned it.
Serendipity!


Thursday, February 14, 2013

Valentine "Kiss" Tote Bag


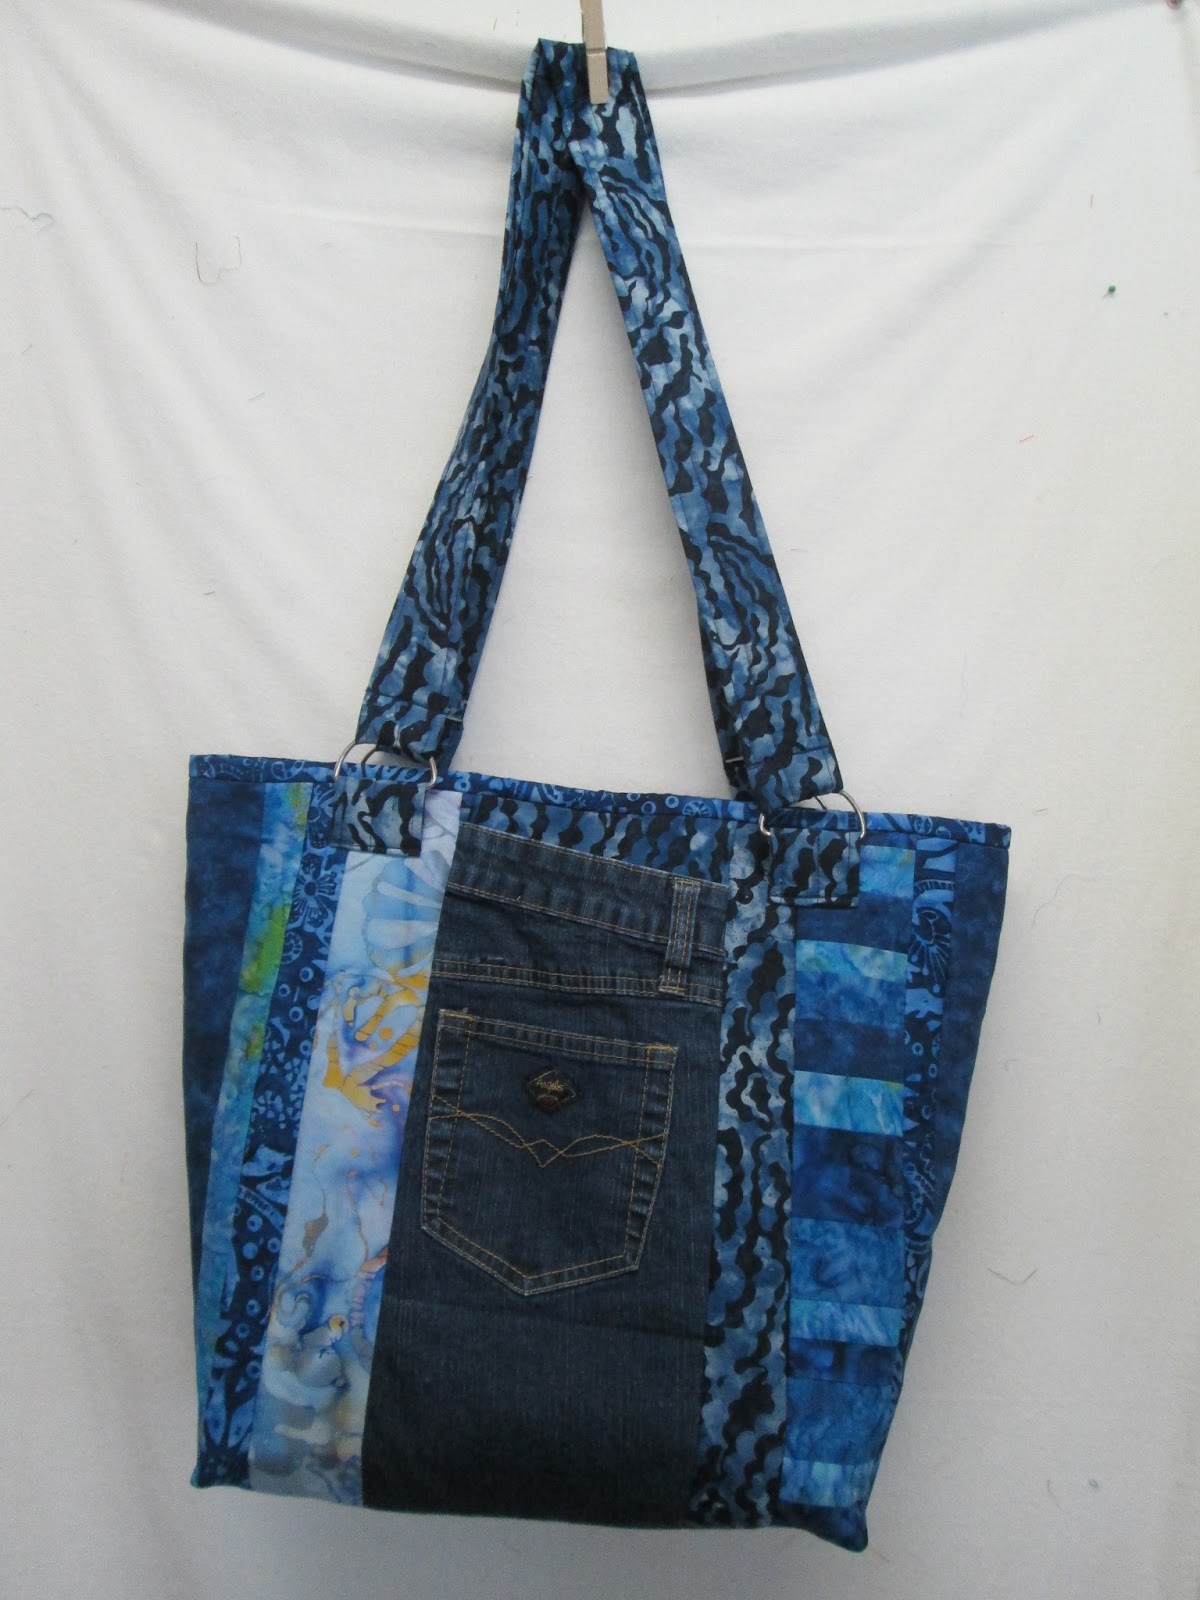
This is the bag I told you about in my last post.  Here are the directions, just in time for Valentine's day.

Materials needed:  1 1/2 yards of main fabric ( you will quilt one yard of this)
                             1 yard of backing and one yard of batting for quilting
                              4 two-inch "D" rings
                              1/4 yard of lining for pockets and flap (I used tissue Lame because I wanted something that looked like Hersey Kiss wrapping, but use something that coordinates with your fabric)
                             a magnetic purse snap
                              1 yard of fabric for lining
                              9" zipper if you choose to add a zippered inside pocket
                               1/4 yard of fusible interfacing if you are using tissue lame (not necessary for normal cotton fabric.

First, quilt one yard of fabric.
From this fabric cut:   2 pieces 20" by 17"
                                2 9 1/2" squares for the outside pockets
                                2 pieces 2" by 21" for the handles
                                6" by 7" for flap
From the unquilted fabric cut 2 pieces 4" by 21" for handles and 8 3" by 4" pieces to hold the D rings to bag.
From the lining fabric cut 2 pieces 20" by 15" and pocket fabric*.

*I am not including the instructions for the inside pocket.  You may choose to add more than one, a zippered one, or none at all.


 First I made the pockets and the flap.  I used a fusible interfacing pressed to the lame.  As you can see, I cut it just inside the seam line to avoid extra bulk.  I rounded off the 6" side of the flap as shown.  Stitch the right sides together and leave an opening for turning.  On the pockets, I made the opening on one side and on the flap, I left the opening at the top.  Turn and press.


Make the handles.

Use a scant 1/2" seam allowance and sew the 2" quilted strips to the 4" unquilted strips.  When these are turned you get a nice edge as shown in the photo above.


Next stitch a pocket on each side of the main part of the bag.  Then sew on the flap in the center of the top of one side 4" below the top.

Now make the "loops" to hold the D rings on the bag.  Take two of the 3" by 4" pieces and sew them with right sides together, leaving one of the short edges open.  Make 4 of these.  Turn and press.  Use these to attach the D rings as shown below.


Then add the handles to the D rings as shown above.
Now you can sew the front and back of the bag together,leaving the top open.

Cut a 2" by 2" (not including seam allowance) out of the two bottom corners of the bag.
Match the seams as shown and stitch.  This will give you the box pleat for the base.

This is what the bag looks like at this point.  Add the magnetic snap to the flap and to the front of the bag using directions on the package.  You may choose to make a button hole and button. 
Now make the lining.
If you want to add pockets, add them to the lining before stitching the sides and bottom.
Sew the sides and bottom.  Leave a 6" opening on one side of the lining.  Cut the corners and stitch as in the photos above.

Now pin the lining to the top of the main part of the bag matching seams and with right sides together.  Be sure that the flap and handles are out of the way and stitch all the way around the top.

Pull the bag through the opening in the lining.
The bag now looks like this.
Stitch the opening in the lining closed by hand or machine.

Turn the top of the bag to the inside and press.  Now top stitch along this seam line.

To finish, I made a yo-yo to cover the snap on the flap.  You could use a button or beads to do this.
 I stuffed it with a little bit of fiberfil and then hand stitched it to the flap.

I hope that this pattern will inspire you to make your own tote!