Wednesday, December 12, 2012

I Had a Winner!!!!

Last Saturday my ASG friends, from our local neighborhood group, made our way across the Bay for the annual Hampton Roads Chapter holiday party.  Everyone was supposed to wear a scarf, shawl or wrap that they had made.  And guess what?  Mine won in the wrap division.  I got a give certificate to Fabric Hut, which I am going to save until after the holidays.


It looks a bit different on my malnourished mannequin, especially considering she doesn't have any arms.

You may remember a post I wrote about a year ago on socks.  I probably knit another 10 or 11 pairs this year, so this leaves me with lots of small balls of left-over sock yarn.  And, you guessed it, I used some of that yarn to knit this wrap.  I used size 6 circular needles and cast on too many stitches to count.  I knit until I got sick of it,and then bound off.

I have enough yarn to make at least one more, but right now I'm finishing up Christmas gifts.  I'll do a blog soon about what I am making and have a few patterns.  Except for what I'm making I've finished with the shopping, put the tree up, tiled my kitchen back-splash, and written a novel.  O.K. I'm lying about the novel. I just said that to get your attention.

Hope you have a stress-free holiday.

Wednesday, November 28, 2012

Artisan Guild Tour

The Thanksgiving Tour is over for another year.  My sales this year were the best I've ever done for this tour, so in my opinion the economy is looking up.  I decided to post a few pictures of the shop taken on Friday morning before the sale.  I've posted pictures of my studio before, but never the shop.  This is mainly because its been a mess for the past few years.  It took weeks to clean it up and get ready for the tour, but was definitely worth it.  This picture came out a little blurry, but note my toy sewing machine collection on the top shelf.  The pottery in the middle of the shelf is Dan's and the baskets on the shelf and table are by Deb Finnegan.
 The bird carvings and decoys pictured below are by David Farlow.  Deb, David and I have shared a space for the show for the past 4 years.


They were also very pleased with their sales.

This is a view of the other side of the shop and that's the door to my studio in the center.  

And this is "behind the counter" with a view of the Passport Prizes. (Not the quilts hanging on the wall, they are mine).  The prizes were donated and represent all of the artists participating in the Tour this year.  We will have a drawing in the next few days to find the winners.
I am now trying to get back into a regular routine.  I have a number of Christmas presents to make for family and now that the shop is cleaned up, its time to start cleaning my house!  

Thursday, November 8, 2012

Only Two Weeks Until Thanksgiving!!!

I just looked at the calendar and had a moment of panic.  Thanksgiving means cooking and eating and family and friends to all of us, but for me its also the weekend of the Artisans Guild Studio Tour.  I will be opening my shop/studio this year and will have two guest artists with me.  What this means for me right now is finish projects and do some CLEANING.


In order to fill the shelves (most of my work is on the wall), I decided to make a few pillows.  First I quilt the design on cotton duck with a backing and batting.  Then I paint the design with textile inks and paints.  It reminds me of coloring when I was a child, my favorite past time next to reading.

 Here are some crab pillow tops waiting for me to add the backing and stuffing.  On the Eastern Shore of Virginia anything with a crab on it sells.


These are my poppy pillow tops.  I did orange to match the fabric that I will be using for the backing.

I'm giving myself the rest of this week to sew, then I will be forced to start the cleaning.

Wednesday, October 24, 2012

Basket Variations

 Here are the pictures of other baskets that I promised.  If you are reading my blog for the first time, go back to the 2 previous postings for instructions on how to make this type of basket.

These two baskets are basically the same, one is 6 inches in diameter and the larger is 9 1/2 inches.  I made the larger one because the first one was almost impossible to flip.  I used transition coils for all of the snow and then one row of coiling in a blue before I started the patchwork part.  You can't tell from the photo, but I used silver metallic thread all across the sky.


 This is another basket with an applique inside.  It's 9 inches in diameter and 3 1/2 inches high.

This is a trivet and coaster set.

Another trivet, about 10 inches in diameter.

And finally, this is the largest basket I've made so far.  The base is 12" by 8" and its 7 1/2 inches tall.  It had to be done in two segments.  That is, I coiled about 4 inches up the side then added patches to that.  Then I continued the coils all the way to 7 1/2 inches before finishing the patches.


Friday, October 19, 2012


Fish Bread Basket

Finished size, 7” by 14” by 2.5”

Materials Required:     One hank (100 feet) of clothesline
                                    Various scraps of blue cotton cloth
                                    ¼ yard of dark blue fabric for coils
                                    Several small pieces of various orange fabrics for fish appliqué
                                    6” by 12” piece of Wonder Under® or other fusible web
                                    Thread


Making an oval base.  Start with a length of clothesline and fold it over, as shown below.  The length of this first piece will be the basis for the size of the finished basket.  For a 7” by 14” base, for example, start with a seven inch piece.  With all of the oval baskets that I have made, it seems to work out that the length of center piece of cord ends up being the width of the finished base.  It does not have to be so, you could keep sewing and make the base larger, but for me these proportions seemed correct. Keep the free clothesline in front and to the right side.


Be sure to wind your clothesline into a ball before continuing.  Tie it with a length of scrap fabric and you can let it out as you need it.  You'll have to move the ball in and out of the machine throat often, so this will prevent tangles.

.

Continue coiling and sewing until the base is the desired size.  Keep the clothesline attached and wound in the ball and tied.       

  
 Step 2.  Change the thread at this point to something that coordinates with the fabric.  Add a piece of fabric to the center of the inside bottom of the basket.  In the bread basket example, it will be covered by the fish appliqué, so it can be quite large.  In other examples, the size will vary.  In some of the baskets, I started out with a quilt block left over from other projects.  This piece should not extend over the edge, but if it does, treat it as the fabric pieces in the next step.  Stitch this down at the edges, using the zigzag stitch, or other decorative stitch.  Don’t worry if the fabric puckers a little, you’ll have many puckers and pleats as you sew, but all the stitching flattens them out. 


Step 3.  Now turn your base over.  Sew patches of fabric around the edges, letting them extend over the edge.  Be sure to keep these patches loose and on top; don’t let them get caught and sewn to the other side.  They should extend over the edge at least one inch or more.
End one piece of fabric at the point that the loose clothesline is attached to the base and add another just under this point.


When the entire clothesline base is covered, turn over and fold the patches from the other side down and stitch.  There will be some pleats in this layer.  Once the edge is completely covered (add fabric pieces as necessary), began to add patches in the center, stitching as you go. You'll just need to cover any area that will not be covered by the applique.   Start at the outside edge and continue stitching in a spiral pattern, using a zigzag or decorative stitch, until the entire piece is covered with fabric and there are no loose edges.  This uses quite a bit of thread, but makes a very sturdy base for your basket. 
                                                                                                                       
Tips:  Be sure that the uncovered clothesline (in the ball) does not get caught under the base.  If it does, you’ll know it.  Just remove from the machine and pick out any stitches.   While sewing in a circular pattern, keep moving the ball in or out of the throat of the machine as you turn the base.  I find that moving in a counterclockwise direction is easier.  I’m right handed, so it may be that clockwise might be better for left-handed people.  The direction really doesn’t matter, as long as it is consistent.

Clip any loose threads immediately.  They easily get caught and are harder to remove once they have been stitched over. 

If the machine seems to be struggling, change to a larger size needle, or put in a new needle.  Also, check and make sure that there is not a big build up of lint under your bobbin case.  Let the machine do the work; don’t try to force the clothesline through. 

Be sure that the presser foot is in the down position.  Because the clothesline is so thick, it may feel like it is lowered and it isn’t.

If you find you don’t like a piece of fabric you’ve used, just cover it up with another piece and keep sewing.

Vary the size of the patches.  Using all of one size is monotonous.


Once the base is covered, its time to add the applique.  Use any image you wish, I did a fish and used strips sewn at an angle (as shown below) to make it more interesting.  I'm not giving you a pattern for this, so use your own imagination.  Use Wonder Under or some other fusible to adhere it to the basket base.


5.  Iron the appliqué onto the center of the bottom of the basket base.  Be sure to iron it on the inside, not the outside of the base.  The extra clothesline cord should be on the right side of the base when the loose end is extended toward you.
6.  Stitch the fish appliqué using a straight stitch and going over the outline several times. 


7.  Make the transition coils.  Cut the ¼ yard of fabric into 1” strips using a rotary cutter. (This can also be done with scissors; they don’t have to be a perfect 1”)
Begin by securing one end of a strip right next to the beginning of the clothesline, then wrapping and sewing with a zigzag stitch.   As you sew, begin to tip the bottom up at an angle, so that the bottom touches the left side of the sewing machine.  This will cause the sides to rise.  Make 3 or 4 rounds of coils with the strips and then continue to coil with just the clothesline until the sides reach 2.5 inches in height from the base.  


8.  Cut the cord and even the end of the clothesline by sewing over it a few times and trimming.
9.  Stitching on the inside of the basket, add patches to cover the clothesline, leaving some to overhang the edges, just as was done on the base.


10.  Now its time to “flip” the basket. Because it is easier to sew on the inside of the basket, turn it inside-out.  This is not difficult to do with a basket this size.  The outside is now on the inside.  Add more patches, covering all the edges.
11.  When all surfaces are covered, flip the basket back to the original position and it is finished!


Here is variation on the technique, using a round base and no appliques.  Its 3.5 inches high and 8 inches across.
  

 I'll take some pictures of some of the others I've made over the weekend and publish them on Monday or Tuesday.  Hope you have a great weekend, let me know if you make one of these.
  

Thursday, October 18, 2012


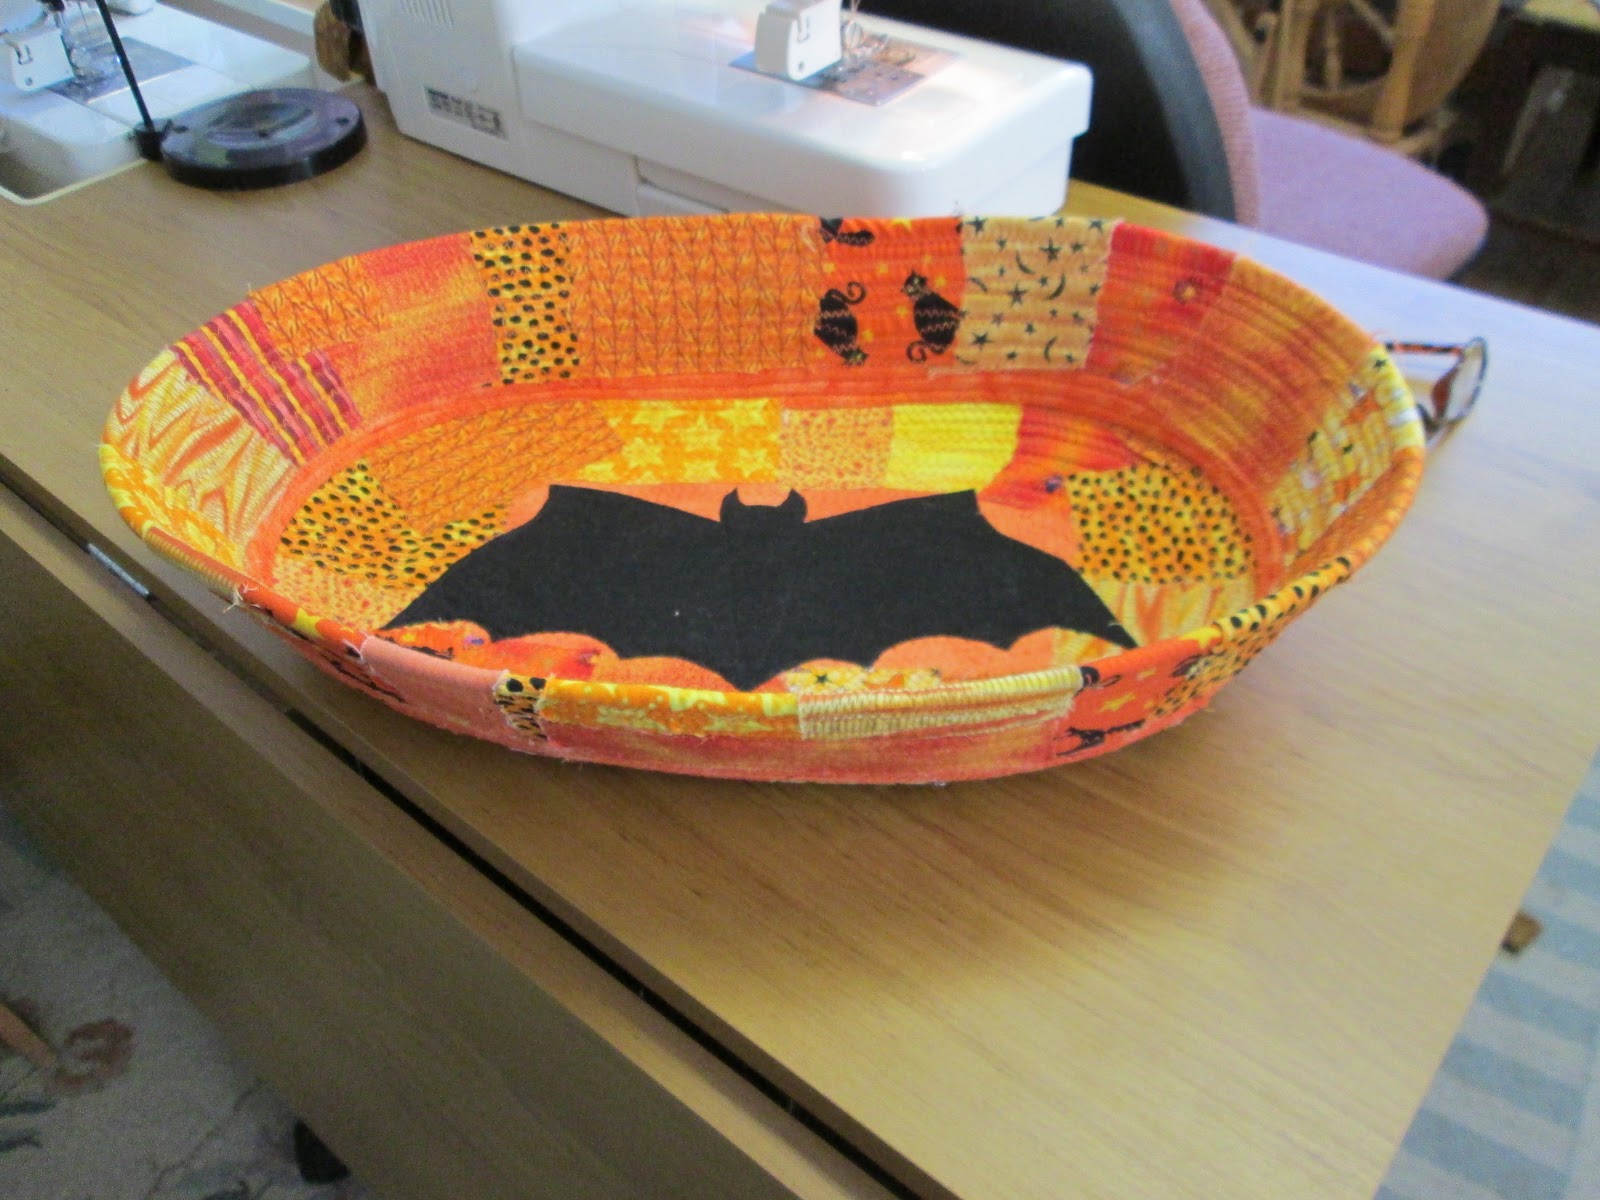
Over the next few days I'm going to share instructions for making the basket shown plus a lot more using my technique.  This is an article that I wrote last year and sent off to several magazines.   Since I had no interest from the major publishers, I decided to publish it myself in my blog.


Depending on your point of view, baskets were the first craft.  Potters claim ceramics came first, but that makes no sense to me.  Obviously our hunter/gatherer forefathers and foremothers needed something immediately to carry home the nuts and berries.  They didn’t have time to wait for the clay to dry and then throw the pots in a fire, so they picked up a couple of big leaves, twisted them together, and viola! A basket.

Baskets became important parts of all traditions throughout history.  They were used as trade objects, gifts, ceremonial items, and for just plain practical storage vessels.

When the first book on fabric bowls came out, I sold the book in my quilt shop, and made many samples.  Then a few years later another book, this one on coiled fabric and clothesline baskets was published. Again, I stocked it in the store, sold many copies and made several samples.  I was hooked for a while on churning out these coiled, fabric covered clothesline baskets.  In both of these techniques, something was missing for me.  The coiled baskets eventually bored me and the fabric bowls didn’t have enough “body” or weight to make them feel right.

I stumbled upon the technique shown in this article while I was making a few baskets to hopefully sell at some local craft shows along with my quilts.  I rejected a number of the baskets that I made because they were too complex, too time consuming, or I just didn’t enjoy making them. 

Please use this article as a starting point for your own ideas and explorations.  If you make enough, you’ll find your own voice through colors, designs, and images.  I believe that the satisfaction that we get from making a basket is part of our DNA.  It takes us back to a time when we made things out of necessity, but also allows us to express ourselves in our own art form.

Materials   All of the materials discussed in the section are readily available in craft, fabric and/ or discount stores.

Clothesline

There are several types of clothesline available, but the one I use the most is cotton reinforced with polypropylene that is sold in 100 foot hanks.  It is 3/16 inch or No. 6.  Due to the popularity of fabric coiled baskets, this is often available at fabric stores or quilt shops.   There are also some brands on the market that have a synthetic core with a cotton cover.  This is generally not suitable for making baskets.  The synthetic core leaves a residue on the sewing machine needle.   3/16 inch cotton cord that is sold by the yard in stores that sell upholstery supplies can also be used,  but this may cost a bit more.  I’ve tried using larger cord, but it is more difficult.  No. 6 is the ideal size.

Many stores also sell nylon cord for clotheslines and this works well in some projects, such as table runners or placemats.  It doesn’t have as much body as the cotton cord, but it washes well and dries more quickly.  More yardage of this cord is required because it compresses as it is sewn. 

The price range is usually between $4.00 and $6.00 and you can make one large or two small baskets from one hank.


Fabric
Most of the fabrics I use are 100% cotton.  Many are batiks, which I prefer, because of the high thread count and the reversibility.  The thread count keeps the fabric from raveling too much and the dying technique used in batiks makes them look the same on both sides, so there is no worry about twisting a fabric to the wrong side.  Fabrics should be pre-washed, especially for table runners or bread baskets that may need to be washed after they are used for awhile.
The baskets and table runners can be washed if necessary.  I actually ran a basket through the gentle cycle on my washing machine and allowed it to air dry.  It survived just fine, although I don’t recommend this method.  If you do need to wash any of these projects, soak them briefly in a sink with lukewarm water, rinse, and roll in a towel to remove excess moisture.  Let it dry in an area with some air movement (like a porch) until dry.  This takes about 24 hours.

Organizing Fabric

There are several ways to sort fabric.  Sorting by color is probably the best way to organize for these projects.  I keep small plastic containers, like small clothesbaskets, in my studio to hold my smaller pieces of fabric.  At a glance, I can see what I have in each color range.   Most of my larger pieces of fabric (1+ yards) I keep in larger, covered plastic containers, also arranged by color. 

Unless I can’t live without it, I don’t buy fat quarters.  I would rather have a quarter yard of fabric so that I can cut long strips of fabric.  Generally I buy at least a yard of fabric at a time to be sure of having enough fabric when I need it.

I keep any scrap of fabric that is larger than 2” by 2” or any long strip, no matter what the width.  They go into one of the smaller baskets.  A couple of times a year I go through all of my containers.  This allows me to remember what I have and often it will be inspiration for a new project.

Thread

Any medium weight cotton or cotton/poly blend thread will do.  Since the thread doesn’t show once the base is covered with patchwork, this presents an opportunity to get rid of some to the odd spools that end up in our sewing rooms and empty some of those half-filled bobbins. 

Variegated threads look very good for top stitching.

Sewing machines and needles

Just about any sewing machine that can do a zigzag stitch works.  It may seem that it would be difficult to sew through the clothesline, but its not.  The needle size should be at least a 90, nothing smaller, and the ideal needle is a size 100 universal. Change the needle often, they tend to dull easily.
                                                                                                           
Be sure to clean your machine regularly while making baskets.  There does seem to be a lot of lint generated.  Also, I oil my machine after each basket, but check with the owner’s manual for guidelines.

I use a good, basic machine that I reserve just for basket making.  I would avoid making many of these on a computerized machine that also has an embroidery function.

Notions

Clothespins are very helpful for holding things in place while working, so get a package of the spring-type when buying clothesline.  The other necessities are an iron, cutting board and rotary cutter, 2 pairs of scissors (one for fabric and one for clothesline), a tape measure, and other general sewing notions.  I keep an inexpensive pair of scissors just for cutting clothesline.

A couple of the appliqués use a paper backed bonding agent like Wonder Under®.

I’ve also used fabric inks and markers in some of the baskets.  Any brand will do as long as they are permanent. 


Check back tomorrow and I'll begin the instructions for making the basket shown above.

Tuesday, October 9, 2012

Neat Trick for Half-square Triangles

I saw this on Pinterest a few weeks ago.  There was enough information in the picture to show me how its done.  But when I clicked on the link, it took me to an ad for diet pills!!!  I guess whoever was selling the pills knew that a lot of us quilters are a bit overweight.

Anyway, I decided maybe I was the only quilter in the world who didn't know this trick, so I took it to my next ASG meeting and guess what?  No one there had ever seen it before and also thought that it was a neat way to make half-squares.


First you sew 2 squares together (right sides together) using 1/4 inch seam.  Then you cut them apart on the diagonal as shown above.

When you fold them out, you have 4 half-square triangle blocks.

The block shown is 5 inches to start.  It makes four three inch blocks.  I also tried it with 4 inch squares and that makes 2 3/8th inch blocks.  I guess if you need a specific size, you could experiment to find the right starting size.  I haven't been able to come up with a formula for the math yet, but I haven't thought about it too hard.
Hope that you find this useful.


Tuesday, October 2, 2012

Crazy about Ikat


I've had this thing about ikat fabrics for a long time.  Back in undergraduate and graduate school, I liked the look so much that I learned to weave the ikat patterns.  True ikat is achieved by wrapping the warp threads of a weaving and then dying the warp before putting it on the loom.  Most of the fabrics that we see today in home dec and clothing are not true ikat, but printed imitations of the designs.

http://pinterest.com/kittyanne/ikat/

If you follow the link above, it will take you to my pinterest board on ikat.  I've been saving the images for some time.  

Currently I've gotten a little crazy about the new ikat prints I've seen.  I recently ordered a new chair for my living room in an ikat print and just finished making another ikat print into sofa pillows.  

But to show that I really do know how to do the real thing, here is me circa 1986 in a coat that I made (along with 5 others) for my M.F.A. exhibition at the Lowe Art Museum in Miami.  I took the coat apart a few months ago intending to make something out of the sleeves, which are ikat that I dyed and wove.   The picture of me is my page in the exhibition catalog.  All but one of the coats in my show had ikat sleeves with a painted (with dye) and quilted body.  I still have all but one, which I sold.

Will I ever weave ikat again?  I doubt it.  I sold my loom a few years ago to focus on quilting and have no intention of buying another one.  So I'll just be content with my new decorator prints secure in the knowledge that I could have woven the fabric myself.

Monday, September 24, 2012

On-line Classes


Before I describe the above image, let me update you on my computer issues.  By last Thursday, I had the new computer.  I took pictures, downloaded the software for the new camera and was ready to write this post.  Guess what?  Our internet went down...for the whole weekend.  Hopefully all is well now with good old Verizon.

I signed up for two on line classes through craftsy.com , one called "Stitch and Slash".  I watched all of the sessions at one sitting.  This took about 3 hours total, but I like to know where I am going with a project before I start it.  The pillow pictured above is my first project based on this class.  It was so much fun to do that I'm going to make a few more.  In fact, I have piles of coordinated fabrics just sitting on my cutting board waiting for me to start.  The size is about 15" by 20".  The fabric is all batik.

The other class I signed up for is a spinning class.  I have a spinning wheel that I have never quite mastered, so I'm hoping that the class will be just what I need to make me a master teach me the basics of spinning.


Sunday, September 16, 2012

Ready to Post...One Small Glitch

On September 1st I ordered a new computer.  This was very exciting for me because my old laptop had lost all the audio, so I could not hear anything, and it has no memory left.  Well the poor thing is 8 years old, so it is time for a new one.  That new computer was supposed to be delivered on the 5th.  On the 5th I received an email that said that my order was being processed and it would arrive on the 10th.  On the 10th I got an email which said I would get it on the 14th.

By the 14th I was a bit frustrated, so I contacted the computer company (which shall remain nameless, actually I'll tell you if you email me privately.).   After finding out the "chat" person could not help me, I was referred to a phone number.  I pushed all the right numbers and was disconnected.  I pushed all the right numbers a second time, told the computer voice I wanted to speak to a person.  She didn't understand me, not once but three times.

I was finally connected to a guy named "Brille" (it must be a real name, I had him spell it for me).  After explaining my problem i.e. no computer, the conversation went something like this:

Brille:  You ordered the computer from our business department and you are not a business.
Me:  I ordered it on the phone from a person named John who told me it would be here on the 5th.
Brille:  But you are not a business.
Me:  John knew that.  Maybe he sent the order to the wrong department.
Brille:  But you are not a business.
Me:  Yes, we have established that.  I just want to know when I will get my new computer.
Brille:  We can't send it to you because you are not a business.
Me:  So how do we straighten this out?  Do I need to send in a non-business license so you can send me a personal computer.
Brille:  Someone will be contacting you.
Me:  When?
Brille:  I don't know.
Me:  What division are you in?
Brille:  Customer service.
Me:  Can't you do this?
Brille:  No.
Me:  I want to cancel the order.
Brille:  You want to cancel the order?
Me:  That is correct.
Brille:  Then you won't get the computer.
Me:  That is correct. There are other computer companies out there who will be glad to take my credit card number and send me a computer.
Brille:  Alright I'll cancel it.
Me:  Have I been charged?
Brille:  Oh no, we never charge until its shipped.
Me:  Good, give me the cancellation number.
Brille:  The what?
Me:  The cancellation number, you know the number that says that this is a canceled order.
Brille:  I don't have that.
Me:  Of course you do, its right there on your computer screen.
Brille:  Oh, O.K.  and he gives me a 7 digit number that at this point I'm sure he made up.

I said good bye, got on the computer and ordered a computer from another company.  They say it will be sent on the 17th, we'll see.

In the meantime, I got a new camera for my birthday.  Its great.  I love it.  But I can't down load any pictures to post because it only works with Windows 7.  Which I won't have until I get my new computer.

Saturday, July 21, 2012

Almost Back to Normal

Over the last week I have had several emails from some of my followers wondering why I haven't posted recently.  I appreciate your concern.  On May 23rd, my mother passed away.  It was not sudden; she knew she was dying.  Putting her on Hospice was one of the hardest things I have ever had to do, but it opened up conversations (with her) and she had time for all of her grandchildren and other family to visit and say goodbye.  She planned her funeral and the reception following and she wanted it to be a celebration.  And it was.  I miss her tremendously, but know she had a good life.

About a week after she passed away, I told Dan I had to get away for a few days.  That same day we had an email from Princess cruises with a "last minute" deal on a cruise to Norway.  So, with only a few days to pack, we flew to London and then went on a 12 day cruise.  Mom would have loved it.  I feel she was with me, I wore some of her clothes (we were almost the same size), tried and failed to read a book a day (Mom read a book a day right up until the last few weeks of her life), and just relaxed.

This was my first trip in over 2 years other than brief trips to visit grandchildren.  And right now I'm packing for another trip, one that I had planned since early spring.  My son-in-law is in Glasgow doing research and I'm flying over with my daughter and 2 grandchildren next Thursday.  So I won't be doing any more blogs until I return from that trip, but I have every intention of getting back to a normal routine by the end of the summer.

I'm hoping that all of you are having a creative summer and look forward to visiting with you again in the fall.

Thursday, April 26, 2012

A Brief Hiatus

I'm taking a short break from blogging. My mother has been back in the hospital for the past week, this time with pneumonia.  She is somewhat better, but I need to be with her in the hospital.  Yesterday, we had a problem with medications and if I hadn't been on top of it, she would have missed an entire dose of IV antibiotics.  Unlike those of you who live in large metropolitan areas, we only have one small hospital and don't have the option to go elsewhere.  This leaves us at the mercy of those who work there, some very good ones, and some not so good.

Hopefully by this time next week all will be back to normal.  I am missing my sewing, but have knit quite a bit while just sitting!

Sunday, April 15, 2012

Easy Ornament Tutorial

I know that its over 8 months until Christmas.  Maybe I'm early, but I decided to make these little ornaments to give as gifts to people who visit during the Artisans Guild Thanksgiving Weekend Tour.  So I made 245, to date.  And that's probably all I'm going to make, because I narrowed my Christmas fabric down from 2 boxes to 1 box.  Also I ran out of snowflake sequins.  If I run out, too bad.  You should come on Friday or Saturday if you want one.

 To make these you need a total of 4 circles of fabric (2 for the front and 2 for the back).  2 are cut  4 inch diameter and 2 are cut 3 inch diameter.  You will also need needle and thread, a piece of ribbon about 4 to 5 inches long, 2 snowflake sequins and 2 seed beads.
I'm using this piece of origami paper to illustrate this because it has a definite right and wrong side.  It is metallic, so there is some reflection, but its the only piece I could lay my hands on today.
Fold the circle in half and then half again to find the center.  You can either place a pin to mark it or just crease it, as long as you can tell where the center is.
Open the circle and fold one side up to the center.
Now, working clockwise, fold the corner to the center.
Fold the next corner to the center.
And the next corner.
And the next....
Now all raw edges are inside except for the tiny point.  This will be covered by either the smaller one of these or by the sequin.  Here is the order for making the ornament.  Have your needle threaded and knotted before you begin.
  • Fold one of the 4 inch circles as above.
  • Put the needle into the back, bring to front (in center) and make one stitch.  Thread and needle are now on back.
  • Make a loop of the ribbon and stitch this onto the back.
  • Make another 4 inch and sew this so that the two circles are back to back.
  • Make a 3 inch and place on top of one 4 inch, stitch through all layers to other side and add another 3 inch.
  • Now sew on a sequin using a seed bead to secure it.  
  • Go through to the other side and do the same
  • Bring needle to center (between the two 4 inch circles) and secure with a few stitches.
Done!!

It takes me 7 minutes to make one, not counting the time to cut the circles.  I've got it down to a science.  I just got out my calculator and figured out I spent 28 1/2 hours making these.  That's really kind of sick.
Here's a picture of my pile.

Wednesday, April 11, 2012

Back to Work, Hopefully

Its been over a week since I wrote, but life has a way of happening.  My mom was in the hospital over the Easter weekend, so I needed to be in and out of there to be sure she was o.k.  One of my daughters came to visit with my grandson.  But today, I finally was able to go over to the store and sew for a few hours.  I'll have a new project to show you in a day or two.

Sew much fabric, sew little time.

Monday, April 2, 2012

An Easter Project

This blog was going to be about a Christmas ornament that I am making, or rather ornaments, because I'm trying to make 300 and just finished number 158.  Then I thought "wait a minute, its Easter, no one wants to make these ornaments now".  (Well, except for me, I'm kind of obsessive-complusive).

Then I remembered this little quilt/table topper I made a few years ago for a sample in my shop.  And after an extensive search, I found it in a box.  The eggs are colored with crayons and it is a good activity quilt for your children or grandchildren.  The only real quilting on it is around the eggs; I quilted and appliqued at the same time.


You will need:
  • 1/4 fabric for border
  • 1/2 yard fabric for main part of quilt
  • 1/8 yard fabric for binding
  • 1/4 yard white fabric for eggs
  • Small amount of fusible webbing for back of eggs.
  • Backing
  • Batting
  • Fine line permanent marker (optional)
  • Coordinating thread, Crayons.  They do not have to be fabric crayons, any will work, but don't use markers because not all are water-proof.
Finished size is 26 by 18.
Cut 2 strips of fabric for the border, 3 1/2 inches by width of fabric.  Cut each of these into two pieces, one 26 inch piece and one 14 inch piece.
Cut the main fabric into a rectangle, 14 inches by 20 1/2 inches.  Sew the 14 inch strips of border fabric to the top and bottom, then sew the side borders on.
Now make a pattern for the eggs.  Mine is 5 inches long.  I just sketched until it looked right, but there is a tutorial on how to draw an egg here.

Next press the fusible web onto the back of the white fabric, following manufacturers directions.  Trace your egg onto the fusible and cut out.  Fuse the eggs onto the quilt.

I have 7 eggs on my quilt, you could have more or less depending on how large or small you want them.

Layer the top, batting and backing.  Using a small zig-zag stitch, applique the eggs to the quilt, stitching through all layers.  Add more quilting, if you wish.  Cut binding fabric and bind as usual.
Now the next step is optional, but I drew designs on the eggs using a permanent maker.  You can just let the kids make up their own designs.  Let the kids color the eggs with crayons and then to make the color permanent, place a paper towel over the eggs and press with a warm iron.  This will heat set the crayon color and you'll be able to wash it after Easter.

I hope everyone has a Happy Easter and/or Passover.

Wednesday, March 28, 2012

Needle Case Tutorial

I have made about a dozen of these little needle cases to give as gifts, so this one and the one I use are the only ones I have on hand right now.  The size is 3 1/2 inches by about 2 3/4 inches.  The rose makes a great small pincushion.

To make one you will need small pieces of felt and embroidery floss.
Cut one piece of felt 3 1/2 inches by 6 1/2 inches for the cover and two pieces 3 inches by 6 inches for the inside pages.  Place the small pieces on the larger piece and stitch down the middle as shown below.


You can now sew the edges of the cover using a blanket stitch and 3 strands of embroidery floss.  You can do this step before adding the inside pages if its easier for you.

Now make a stem and leaves to decorate the front.  Cut two leaf shapes out of felt and stitch with a blanket stitch.  I used a chain stitch for the stem.

To make the flower, you need a 4 inch diameter circle of felt. 
A circle this size will make a rose this size.
Cut the circle into a spiral, as shown below.
Beginning in the center, pleat the felt and begin to stitch.  Shape and stitch as you go around, picking up more of the spiral.  The bottom of the flower should be fairly flat.
I found a tutorial for making these flowers some time ago on another blog.  I thought I had bookmarked it, but today when I looked for it, I couldn't find it.  Sorry if I didn't give someone the credit they deserve.

Along with these little needle books, I like to give a little sewing kit, like this one.

Outside of sewing kit
 Inside of sewing kit.  Pocket for small scissors.

You can find a pattern for this little sewing kit here.  Its on the Connecting Threads website.

I hope you can use these ideas for some of your small gifts.