Today I'm going to show you what I think is the most simple of the Seminole Patchwork strips. If you have not seen my previous blog entry, to HERE for an introduction to this series.
First I 'd like to talk about fabric selection. Large prints or prints that have a high contrast are not suitable. The prints conflict with the small patches. Select solids or blenders like batiks or Moda Marbles. I decided to use gray, yellow, black and white solids for my demo because of the high contrast.
 If you are planning on making this sampler along with me, pick at least 4 fabrics. You'll need a total of 2 yards. I'm going to be using less of the black and white and more of the gray and yellow, so I will probably need about 3/4 yard of each of the gray and yellow.
For the first strips, I will be using just the gray and yellow. (all cuts are by width of fabric unless otherwise stated)
1. From each of these fabrics cut 2 strips 2 1/2 inches wide and 1 strip 1 1/2 inches wide.
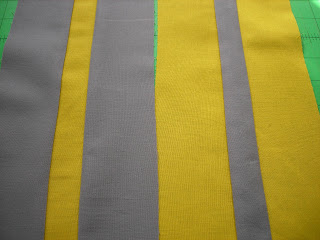
2. Sew the strips as shown below (use 1/4 inch seams throughout)
 3. Press the strips so that the seams go in opposite directions. i.e. they either face each other in the middle or they both go out towards the raw edges.
 This is important. The reason will become clear as you sew, but basically its to avoid bulk where the seams meet.
4. Cut each strip into 1 1/2 inch segments. Here is a rule to remember when making this strip. Always cut the segment by the width of the center (the original width, not the sewn width). You can make these strips larger or smaller by varying the width of the strips, but this rule is the same.
 5. Stitch the segments together. Sew in pairs, then match those pairs and so on until you have one long strip. The bottom of the gray block is matched to the top of the next. (see below)

 I like to chain these as I sew.
Once all the segments are sewn together, you will have a strip approximately 36 inches long. These will be trimmed later when we come to the point of making the sampler.
 Note how all the points meet perfectly and the centers are perfect squares. This is a nice technique for making borders in quilts.
Let me know if you have any questions about this. We'll do another pattern in a day or two.
First I 'd like to talk about fabric selection. Large prints or prints that have a high contrast are not suitable. The prints conflict with the small patches. Select solids or blenders like batiks or Moda Marbles. I decided to use gray, yellow, black and white solids for my demo because of the high contrast.

For the first strips, I will be using just the gray and yellow. (all cuts are by width of fabric unless otherwise stated)
1. From each of these fabrics cut 2 strips 2 1/2 inches wide and 1 strip 1 1/2 inches wide.
2. Sew the strips as shown below (use 1/4 inch seams throughout)


4. Cut each strip into 1 1/2 inch segments. Here is a rule to remember when making this strip. Always cut the segment by the width of the center (the original width, not the sewn width). You can make these strips larger or smaller by varying the width of the strips, but this rule is the same.


Once all the segments are sewn together, you will have a strip approximately 36 inches long. These will be trimmed later when we come to the point of making the sampler.

Let me know if you have any questions about this. We'll do another pattern in a day or two.
No comments:
Post a Comment