Thursday, February 21, 2013

Thinking of Spring

I'm tired of the cold and wet winter.  Snow would have been nice, but all we got was a bit of slush.  So I started thinking about making something to wear when the weather finally warms up.  I'm also thinking about clothes to take on a cruise that I've booked for next year.  More on that later.


I've had this pattern for a couple of years but never got around to doing anything with it.  Last week I showed you some silk that I brought back from China.  This is another piece from that trip.


I thought it would look good with black slacks and a tank top to wear to dinner on a cruise, but I wasn't about to cut into it until I tested the pattern.  Besides I wasn't sure I had enough fabric.  I bought 2 meters, which is 2 yards 6 inches.  The pattern for the shorter version needs 2 1/2 yards.  Usually I can make it work, but since I hadn't tried the pattern I wanted to be sure.

I found a piece of light weight denim that someone must have given me. (I think when you sew, you attract fabric like a magnet.)  It was about 1 1/2 yards, not enough for a jacket, but enough for a vest to test the pattern.


This is the front.  It looks a little stiff because I still haven't hemmed it or tacked down the facings. I used bias to face the armholes.  The pattern went together beautifully and I plan on cutting out the silk tomorrow.  As you can see, I added a bit of embellishment to the vest, the denim was just to plain and boring by itself.


When I brought it back over to the house to do the hand sewing, I remembered this scarf that my friend Linda brought me from Italy last fall.  The colors are perfect and I really had not planned it.
Serendipity!


Thursday, February 14, 2013

Valentine "Kiss" Tote Bag


This is the bag I told you about in my last post.  Here are the directions, just in time for Valentine's day.

Materials needed:  1 1/2 yards of main fabric ( you will quilt one yard of this)
                             1 yard of backing and one yard of batting for quilting
                              4 two-inch "D" rings
                              1/4 yard of lining for pockets and flap (I used tissue Lame because I wanted something that looked like Hersey Kiss wrapping, but use something that coordinates with your fabric)
                             a magnetic purse snap
                              1 yard of fabric for lining
                              9" zipper if you choose to add a zippered inside pocket
                               1/4 yard of fusible interfacing if you are using tissue lame (not necessary for normal cotton fabric.

First, quilt one yard of fabric.
From this fabric cut:   2 pieces 20" by 17"
                                2 9 1/2" squares for the outside pockets
                                2 pieces 2" by 21" for the handles
                                6" by 7" for flap
From the unquilted fabric cut 2 pieces 4" by 21" for handles and 8 3" by 4" pieces to hold the D rings to bag.
From the lining fabric cut 2 pieces 20" by 15" and pocket fabric*.

*I am not including the instructions for the inside pocket.  You may choose to add more than one, a zippered one, or none at all.


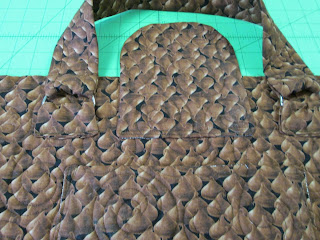
 First I made the pockets and the flap.  I used a fusible interfacing pressed to the lame.  As you can see, I cut it just inside the seam line to avoid extra bulk.  I rounded off the 6" side of the flap as shown.  Stitch the right sides together and leave an opening for turning.  On the pockets, I made the opening on one side and on the flap, I left the opening at the top.  Turn and press.


Make the handles.

Use a scant 1/2" seam allowance and sew the 2" quilted strips to the 4" unquilted strips.  When these are turned you get a nice edge as shown in the photo above.


Next stitch a pocket on each side of the main part of the bag.  Then sew on the flap in the center of the top of one side 4" below the top.

Now make the "loops" to hold the D rings on the bag.  Take two of the 3" by 4" pieces and sew them with right sides together, leaving one of the short edges open.  Make 4 of these.  Turn and press.  Use these to attach the D rings as shown below.


Then add the handles to the D rings as shown above.
Now you can sew the front and back of the bag together,leaving the top open.

Cut a 2" by 2" (not including seam allowance) out of the two bottom corners of the bag.
Match the seams as shown and stitch.  This will give you the box pleat for the base.

This is what the bag looks like at this point.  Add the magnetic snap to the flap and to the front of the bag using directions on the package.  You may choose to make a button hole and button. 
Now make the lining.
If you want to add pockets, add them to the lining before stitching the sides and bottom.
Sew the sides and bottom.  Leave a 6" opening on one side of the lining.  Cut the corners and stitch as in the photos above.

Now pin the lining to the top of the main part of the bag matching seams and with right sides together.  Be sure that the flap and handles are out of the way and stitch all the way around the top.

Pull the bag through the opening in the lining.
The bag now looks like this.
Stitch the opening in the lining closed by hand or machine.

Turn the top of the bag to the inside and press.  Now top stitch along this seam line.

To finish, I made a yo-yo to cover the snap on the flap.  You could use a button or beads to do this.
 I stuffed it with a little bit of fiberfil and then hand stitched it to the flap.

I hope that this pattern will inspire you to make your own tote!

Monday, February 11, 2013

And the Winner is......


As promised, I am giving this fabric away today.  I had hoped for more comments.  There were 9 plus one from a follower who emailed me to tell me that she couldn't get her comment to post.  I decided to include her as well.  In the interest of fairness, I numbered the comments from one to ten, with the unpublished one being number 10.  I then asked Dan to pick any number between one and ten.  He picked 7, so the winner is Suzanne.  Please email me (kitty@weirwoodstation.com) your address.

I just finished this tote bag for Diana and will be doing a tutorial in a day or so.


Diana is a chocolate lover.  When she was in high school, Dan gave her a necklace with a Hersey Kiss charm.  She has worn that necklace ever since.  When I saw this "kiss" fabric, I knew I had to make her something from it.  I lined the flap closure and the outside pockets with silver (tissue lame) fabric.  I took photos as I made it, but still have to find time to write the instructions.

This was supposed to be a Christmas present for her, but I just finished it this week, so now its a Valentine present.

Monday, February 4, 2013

Quick Project and A Give Away

Yes, I am going to have a give-away.  But first I'll show you my quick project and then you'll know the background of what I'm giving away.

In 2005 I went to China.  I went alone, but I was on tour.  One afternoon I ventured out in Beijing by myself and found a fabric store.  Not a tourist trap fabric store, but a real fabric store where the Chinese shopped.  Things were still fairly inexpensive in China, so I bought enough fabric to fill an extra suitcase for the trip home.  It was so much that I had to stop and rest and rearrange my purchases on the way back to the hotel because the bags were so heavy.  And what did I spend?  Some where between $400. and $450.

I've gotten a lot of mileage out of all that silk, but I still have a box full.  Today I got out the box and made this scarf out of some that I had used to line a jacket, but still had piece left over.


The scarf is made by cutting two pieces of fabric 16 inches by 33 inches.  With right sides together, sew along the short edges, then finish the seam so that it is finished on both sides.  Hem the unfinished edges.
That's it.  The scarf loops over the head twice.

Here's a picture of it full length.   


Now the give-away.  It's a piece of my Chinese silk.  


This is a close-up.

This is most of the piece.  It's 40" by 56" and I have hand-stitched the edges so that it can be worn as a scarf.  It's sheer with embroidery and sequins.  But feel free to make it into anything you want, if you win.

Now the rules.  You must be a follower of my blog and leave me a comment to let me know you want to win it.  I will ship it anywhere in the world that the US Postal Service delivers.  I'll do a drawing for it a week from today, Feb. 11th and notify the winner by posting it here on my blog.  The winner can then email me with shipping information.

Good luck to all who enter!

Saturday, February 2, 2013

New Adventures

A couple of new additions to my life this week:

  • I started a volunteer job working at a thrift shop one day a week.
  • and I finally broke down and bought a Kindle.
The thrift shop is sponsored by the church I occasionally attend and is run by an all volunteer group.  Except for the rent they pay and a few small expenses, all the money they make go to local charities.  I love thrift shops!  At least half of the clothes in my closet came from a thrift shop, so I expected I'd come home with some new treasures.  Not true.  It was so busy, I didn't have time to shop.  So I spent a grand total of $1.25; 3 paperback books and a jumper for my grand daughter.  Maybe next week.

In a moment of weakness, I ordered a Kindle.  I read a lot.  Besides library books I buy paperbacks at thrift shops and trade them with my daughter who also loves mysteries.  But on my last trip, I ran out of things to read.  I didn't take any books on the cruise with me, finished the one I checked out of the ship's library, and knew I didn't have time to read another whole book before the end of the cruise.  I started thinking about getting a Kindle.  

I have resisted this electronic reading thing for a while, but now I have committed to it.  I haven't read a book on it yet, but I downloaded one.   So today I decided to make a holder for the Kindle.   I thought I might do a tutorial on the holder, but I'm not happy with the results.  It looks a little sloppy, so I'll try again at a later date and maybe do the tutorial then.


Here is the outside.


This is the inside, before I sewed on the velcro closure.


This is a ceramic button I bought on my first trip to Budapest.  It's been sitting in my button box since I got it and I had no idea what to do with it.  When I was looking for a large button to cover the stitching from the velcro, I found it and decided it would look cute.  After all, my name is Kitty.