I hadn't planned on making this or doing a tutorial, but I had a call two days ago from a friend who needed a program for our next ASG meeting. Without knowing what I could do, I surfed Pinterest until I came up with a tutorial for this bag. You can view the original here. Its fine as is, but I felt it needed a little more body and a water proof lining, so here is my version.
Supplies needed:
1/3 yard of fabric for outside
1/3 yard of fabric for lining
1/2 yard of iron on vinyl
1/2 yard of craft weight interfacing
Thread
16" or longer zipper
Cut 2 pieces of outside fabric, lining, vinyl, and interfacing 12" by 16". Following manufacturers instructions, iron interfacing to wrong side of main fabric and the vinyl to the right side of the lining fabric. (be sure to read the instructions on doing this if you've never used this product. It could really mess up an iron.)
I used a 22" zipper because 1. I had it on hand, and 2. I like a longer zipper for this application. When inserting it the pull-tab doesn't interfere with the stitching.
Place the lining with the vinyl facing up, then place your zipper along the 16" top edge. Place your outside fabric face down and line it up with the lining and zipper. Stitch along the zipper, being sure to keep the seam allowance even and not stitching through the zipper teeth. The other tutorial has a good photo to help with this.
Fold the fabrics back and do the same with the other side of the zipper. It should now look like this.
At this point, I decided to add a little "handle" to the end of the zipper like you see on men's travel bags.
I cut a piece of fabric 2 1/2 inches by 6 inches, folded it in half and then folded the raw edges inside to meet the first fold.
I pressed this and then top stitched it.
This is the loop stitched in place. I also stitched several times over the zipper at this point to reinforce it before cutting off the excess. On the other end of the zipper, zip the tab down to the center of the bag and then holding the edges together, stitch across the ends to secure them, as above.
Next, with right sides together, stitch the bottom seam. I trimmed this to 1/2 inch and then covered it with a scrap of bias fabric. You could also serge it, but it needs some kind of finish.
Fold the sides so that the bottom seam is even with the zipper and stitch across. Do this on both ends being sure that the zipper is not completely zipped. You'll need to be able to turn it right side out after the next step.
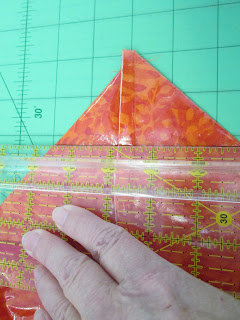
Fold each of the four corners as shown. The measurement is 2 1/4" from the tip to the ruler and 4 1/2 inches from edge to edge. Use your cutting board to square it up correctly. I used a ball point pen to mark the vinyl at this point. This is your stitching line.
Cut off corners as shown.
Turn to right side and add a ribbon to the zipper tab if desired. I had some plastic pony beads that I tied on to the ribbons.
Without the extra interfacing and vinyl, this makes a nice shoe bag for travel or to store dress shoes. It was the perfect size for my size 7 shoes, but if you have a larger foot, you could add 1 or 2 inches to the bag by cutting it 12" by 17" or 12" by 18".
It would also make a nice gift for a man if made in more masculine fabrics or a synthetic suede or leather.


Thanks for sharing this, it looks great in your fabric...J
ReplyDeleteFun and easy little bag. Great idea!
ReplyDeleteAWESOME! I am so proud of myself for making this in one afternoon. I debated about which fabric to use for the interior, but it turns out that you scarcely see the interior due to the box like construction, so dont sweat the fabric choice on the inside. I am so pleased with my Pfaff machine doing a good job on moving through so many thicknesses of different fabrics. The plastic fusing was a breeze. Very cool product. The finished dimensions are ten long, 5 1/2 tall and 61/2 wide which actually looks quite large (but of course will crush down if not full).
ReplyDeleteThank You!!!