Thursday, October 27, 2011

An Easy Gift

I found a tutorial for a little zippered case on Sweet Verbena.  After making one, I modified the pattern just a little and made the two shown below to use for giving money gifts to some of my children or grandchildren (don't get excited, kids, it won't be much this year). 
I cut my fabric 4.5" by 9.5" instead of the 3.5" by 9.5" that is shown in the tutorial. Click HERE for the tutorial.  I also used ribbon instead of the charm.

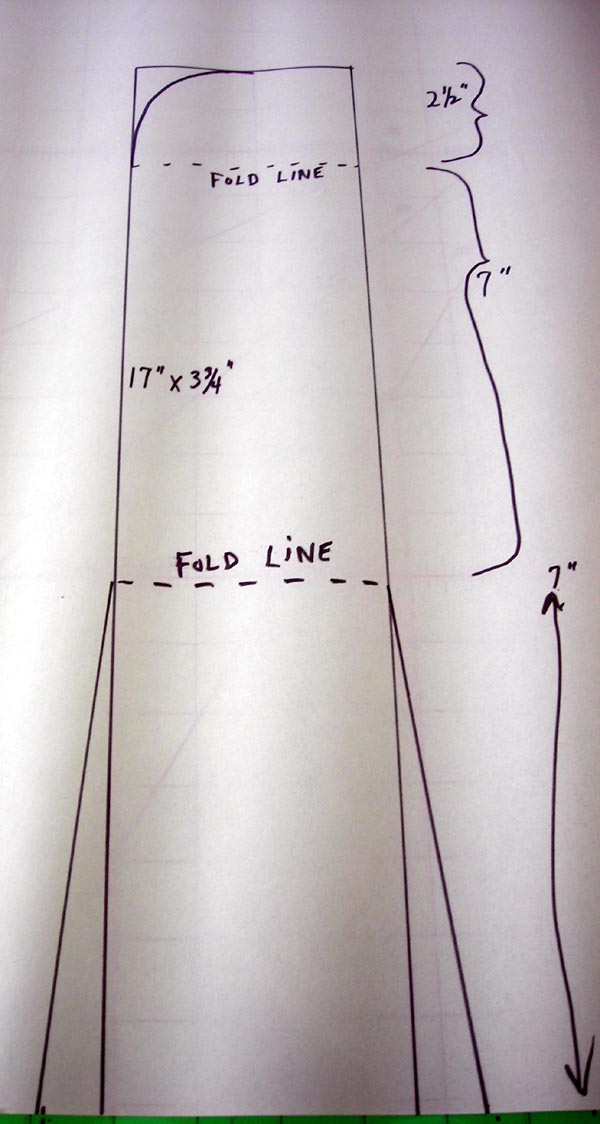
After making these, I decided that I would make a smaller one to fit a gift card, since I am more likely to give these to my adult children.  I used exactly the same technique, but I cut the fabric and felt 4.5" by 4.5" and used a 7 inch zipper.  The finished product is shown below.  It would also make a nice little change purse or case for business cards.

I'm headed to Philadelphia for the weekend to visit my daughter and attend and help with my granddaughter's Halloween party on Sunday.  On my way home I'll stop at Jomar's.  If you are ever in Philadelphia, you have to go to Jomar's.  They have a fabric department with lots and lots of unusual and cheap fabric.  They get stuff that you don't see at the regular fabric stores.  I've gotten fabric left over from Anne Klein fashions and they sell Waverly decorator fabric for 4.99 a yard. Unfortunately, their quilt fabrics are just not the good quality that you find in quilt shops and they don't have much selection.  But for fashion and decor, I love it.  You have to go with an open mind and just hope for a real find.    I'll post what I find on Tuesday after I get back. 

Monday, October 24, 2011

Felted Flower Tuitorial

Today I'm going to show you how to make the felt flowers that you saw in my Oct. 16th blog.  Please go back and look at them, I did mine on a felting machine, but they are easy to make with just a few tools and some wool roving.
You will need:
  • A large sponge that is covered in a fake lambskin or fleece (usually sold in the auto parts section of the store)  I got mine at the Dollar Tree a few years ago
  • A felting needle.  These are available at most yarn shops, or if you live near me, I'll give you one
  • Wool roving.  I used 2 shades of red, some orange and a tiny bit of dark purple
  • Large black seed beads for sewing into the middle and using to attach the flower to a base
Step 1.  Pull the red fleece and arrange it in a circle (doesn't have to be perfect).   Keep it kind of thin, you can always add more fleece later if you think its too thin.

Step 2.  Begin to "punch" the roving with your needle, holding it as shown, but straight up and down.  Pick up the roving from time to time and turn it over.  Punch both sides until you get the degree of felting that feels right to you.  At this point, you can tilt the flower and punch the edges to make them turn up slightly.
Step 3:  After you have made the base (this will be about 4 inches in diameter), make a center layer and a top layer.  The top will have the dark felt in the center.  I used the orange wool on the edges of these smaller ones to accent the edge.
Last step.  Layer the three sections in a way that pleases you and punch the centers so that they are felted together.  You can then attach the flower to a garment, purse, or anything else by sewing it on with the beads in the center.  You may need to additional stitching through the bottom layer so that the stitches do not show.

I hope that you enjoy this technique.  I'd love to see pictures of any projects and will be happy to post them here.  I will be doing a class in this in March for my American Sewing Guild Neighborhood Group, Shore Can Sew.

Thursday, October 20, 2011

Fabric Flowers

The t-shirt pictured is the result of two sale shirts that I bought at the end of the summer.  I'd been looking for a shirt to wear with the skirt shown in the background.  The skirt came from a shop in St. Thomas that I visit each time I go on a cruise to that island.  I always find something there that I like.  This skirt cost about $10.00 and is long, made of rayon patches.
When I saw this shirt, I knew the color was right, but I wanted something a little less generic.  The shirt was $5.00, so I bought 2, one in my size and one size small.  I cut strips from the small shirt, as shown below.
I then stitched these flowers from the strips.  The tutorial shown here is from a blog called "Cherry Street Cottage".  She has lots of other great ideas.
The only difference between what you see on that blog and the way I stitched these flowers is this:  once I made the center of the flower, I began stitching it directly onto the shirt.  Also, I left the "tail" of the end of the fabric hanging down.  Since its a knit plus on the bias, there is no way that it will fray.  Here is a closeup of the flowers, color is a little off, but it gives you the idea.
The rest of the shirt that I cut up is in my "rag bag", but I may be able to get a few more flowers out of it, or get some other idea.  I actually haven't worn this shirt yet, I made it a little late in the season, but will enjoy it next year.
Hope that this gives you some inspiration.  Have a good day.

Sunday, October 16, 2011

Felted Flowers

This is a picture of a boiled wool vest that I bought at a thrift shop a year or so ago.  You probably can't see it, but I left the price tag on, $2.96. 
I got carried away with making felted poppies this week, so this vest and the wreath pictured below are the result.  I am now almost out of red roving and will have to switch to another color or buy more roving.
 The wreath pictured below is about nine inches in diameter.  The base is black felt, which I stitched with a blanket stitch and stuffed.
I think it's really attractive and will probably take it to my mother to hang on her door in her retirement home.
Tomorrow my sewing group,  American Sewing Guild meets.  Hope you have a good week.


Wednesday, October 12, 2011

Eyeglass Case Pattern, Part Two

Here is a picture of the finished eyeglass case.  There are two mistakes in the instructions I gave you in Part One.  The measurements should be 7", 7.5" and 2.5".  I left out the 1/2 inch on the middle.  Also I said "craft weight interfacing", I should have said "craft weight FUSIBLE interfacing".  It makes a difference.
Before I begin the steps in making this, I want to show you how I save my fabric scraps or small pieces.  I have a number of little baskets from the dollar store that I use to sort by color groups.  That way, when I start a project like this one, I have a place to go and find something quickly instead of pulling through multiple boxes of large pieces of fabric.

Step 1.  Lay your piece of batting on top of the muslin.  Using the "Flip and Sew" method, add strips of fabric.  I usually start in the middle and work toward both ends.  If you don't know how to flip and sew, here are 2 pictures that should give you an idea of how its done.

Step 2.  Press the fusible interfacing onto the wrong side of the lining fabric.  Pin pattern onto this lining piece and cut out.


Step 3.  Layer the wrong side (interfacing side) of the lining onto the wrong side (muslin side) of your quilted piece.  Be sure that you have the part you want for the flap in the correct position.


Pin in place.  Using a basting stitch, machine stitch as close to the edge a possible.  The trim off the excess quilted fabric.


Fold your case on the fold lines.  
Now make your bias binding.  Find a tuitorial for making bias binding here http://quilting.about.com/od/bindingaquilt/ss/binding_strips_5.htm
Bind the long edge of the top.  You need to do this at this point, before you sew up the sides.  You also need to sew your velcro in place now.

I find that its easier to sew on velcro with a zigzag stitch.
Once that is done, sew up your sides and then add binding all the way from bottom edge to bottom edge.

I sew this on he back, but it can be done from the front.  Then you will need to hand sew the binding into place.  
On this example I have used beads instead of a button to hide the stitching from the velcro.
I hope you make one of these and enjoy it.  Here is a picture of the back and the front.


Tuesday, October 11, 2011

Eyeglass Case Pattern, Part One

Today I'm going to give you instructions for making the pattern and the list of materials you will need.

To draft the pattern you'll need a large piece of paper, freezer paper works well for this.  Draw a rectangle 17 inches by 3.75 inches.  As you can see above, I have marked fold lines.

Second part of this is to make a mark 3/4 of an inch on either side of the bottom and then draw a straight line from the lower fold line to this mark.  Then at the top, draw a curved line (this will be the flap to close the case).  You can cut off the curve on the left side and then use it to mark the right side so that the curve is even on both sides.  You could also make the flap a V shape or make it square or asymetrical.  Your pattern is complete.
Materials needed:  18 inch by 4 inch piece of muslin, 18 by 4 piece of low loft batting, 18 by 4 inch piece of craft weight interfacing, 18 by 4 inch piece of fabric for lining, 12 inch by 12 inch square of fabric for bias binding.  Various scraps of fabric for main part of the case or, if you prefer to make the case out of one piece of fabric, a 18 by 4 inch piece for this. 
You will also need velcro for the fastener, coordinating thread, and a button for decoration.
Tomorrow I will show you how to sew the case.  Hope you have a good day today.

Monday, October 10, 2011

Coffee , Quilts and the Fall Tour

Yesterday (Sunday) morning tragedy struck in my kitchen.  My coffee pot broke.  I need coffee in the morning.  There are lots of things I have been able to give up like smoking (30+ years ago), candy (haven't had a candy bar in over 6 months), and panty hose (you wonder why I wear slacks most of the time).  But coffee will never be on that list.  I had to get out the Corning Ware percolator that I have kept just in case the electricity goes out.  It just wasn't a satisfactory cup of coffee.  So I had to get dressed and walk over to the store where I had another drip pot. 

Today all of my company is leaving and I'm going to spend the day trying to finish quilting this quilt.  Its by Margaret, and really a beautiful queen size quilt.  The fabrics are all batiks, including the backing. 
Tomorrow I am going to give you a tutorial for an eyeglass case.  I'll probably do it over 2 days because of the length of the instructions.  Every Thanksgiving weekend our local Artisan's Guild has a tour of studios.  I'm not opening the store this year, but will be showing with others at the old Onancock School.  I decided that I needed to make lots of small (i.e. inexpensive) items to sell because of the economy.  One of the items will be these eyeglass cases.  I've made 30 of them so far.  The pattern is my own and you are welcome to copy it to make your own cases for sale (as long as you're not selling them Thanksgiving weekend at the Onancock School).  On the other hand you may find that they are so much trouble to make that you'd rather come out to Tour and buy them from me.

I'm also making felt tree ornaments, make-up bags, mug rugs, doll quilts, and my larger quilts and wall hangings.  The next 6 weeks are going to be busy ones for me.

Friday, October 7, 2011

Upcycle, Turnips and Baking

I like the word "upcycle".  It's just recycling, but upscale recycling.  For some time I have been looking at this old skirt of mine and wondering what to do with it.  The elastic was shot and although I wore the skirt for years, and the matching shirt is long gone, I just liked the color.  So I found a piece of corduroy (they call it corduroy, but its really more of a cord) at Joanne's with the same colors of green.  They only had a yard and a half on the bolt, but I knew I could make a jumper for my granddaughter out of that much.


I used an old pattern for an a-line dress to draft a pattern for a yoke and added a placket on the back for buttons (that I haven't found yet).  I had just enough fabric for the yoke, skirt, and outside of the pockets.  The skirt has 4 tiers.  I cut it 1 inch above the second tier from the bottom.   Would you believe it, that was the exact width of the  top of the corduroy skirt.  I then cut apart the other 2 tiers and cut them in half.  By sewing them together, very creatively, I had enough fabric to face and line the yoke of the jumper and pockets.  Here's a picture of the front of the jumper and the inside of the jumper.  I'm not showing the back because I still have to get buttons for it.  Living an hour from a fabric store is definitely a disadvantage.  I have maybe 2,000 buttons, but no large green ones that I envision for this jumper.  My granddaughter is 6, small for her age and I think this will probably be about mid-calf on her.  She only wears dresses, hates slacks and shorts.


,


Turnips:  This morning my friend Brandi called me and asked if I wanted some eggs and turnips.  I said yes and she came by with a dozen eggs (she has chickens) and a bag of turnip PLANTS.  She had thinned her garden.  Yesterday I planted lettuce, Swiss chard, and pansies.  So I just went back out and stuck those turnips in the ground in between the pansies, the mums and the rest.

Baking:  Tonight my daughter, Cailin, her husband, son, and in-laws are coming from North Carolina.  Also Dan's daughter, Diana, is coming home from college.  So I baked an apple cake I've been wanting to try from Southern Living magazine and a batch of brownies.  Here's a picture of the cake.  I left out the pecans because my grandson has a nut allergy.
Busy weekend ahead.  Enjoy yours.  Thanks for visiting.

Wednesday, October 5, 2011

Welcome!

My first blog.  Welcome all of you who stumble upon my little site on the net.  After much deliberation, I decided to share what I do to anyone who is interested.  The old store you see above (circa 1920) is my former quilt shop and now my studio/storage unit.  I try to work there every day, at least for a few hours.  I quilt, sew, knit, paint, and move things around a lot.

Today I'm showing you what I did yesterday.  It's the first, so the composition is not quite successful, but I did it in one afternoon, just to see how it would look.  I plan on framing it in a shadow-box frame.  The frame size is 11 by 14, so I made the little quilt 10.5 by 13.5.  The flowers are needle-felted and beaded, very three dimensional.  I'm lucky enough to have a needle-felting machine (Janome) which really makes it easy and quick to do these flowers.  The blue ones are quite small, so I had to use my long tweezers to hold the edge as I felted them.  I hope to have more time to work on a similar quilt in the next few days and will post it here.
 
I also do long arm quilting for a few other people, so most of the rest of my week will be working on a queen size for someone else and getting a few fall plants in the ground.
My current plan is to post about twice a week and share some of my patterns with you. 
Thanks for visiting. Have a wonderful fall day.